There are many tutorials that can teach you how to write a blog post.
They can educate you on the mechanics of blogging, what to do, and what not to do.
Read through them and you can learn how to craft a perfectly serviceable blog post. Heck, you might even write something that wins you an adoring fan or two.
But if you dream bigger, if you want to know how to write a successful, engaging blog post that cuts through the noise and wins you legions of fans, you need something better than a run-of-the-mill tutorial.
You need an ultimate guide.
In this post — this ultimate, step-by-step beginner’s guide — we’ll share tips used by professional freelance writers to create spellbinding posts that are adored by thousands. You’ll learn the secrets to crafting irresistible headlines, seducing introductions, captivating advice, and motivational closings.
You’ll even learn how the pros refine and polish their posts once they’re finished writing them.
These are secrets many bloggers would gladly pay real money to learn, but it won’t cost you a thing — other than a few minutes of your time.

Let’s dive in.
1. Craft a Great Headline That Readers Can’t Resist
Want to know one of the biggest mistakes bloggers make?
Writing blog posts before the headlines (aka the post title).
Without a headline, they have no roadmap to follow. And so their post goes in multiple directions, leaving readers feeling dizzy, confused and disoriented.
And then they try to create a headline that embraces all that madness. Bloggers, have mercy!
If you want to write a great blog post full of clarity, conciseness, and conviction, it’s a good idea to spend some time crafting a blog title that sets a clear destination, lures readers in, and leaves them eager for your advice.
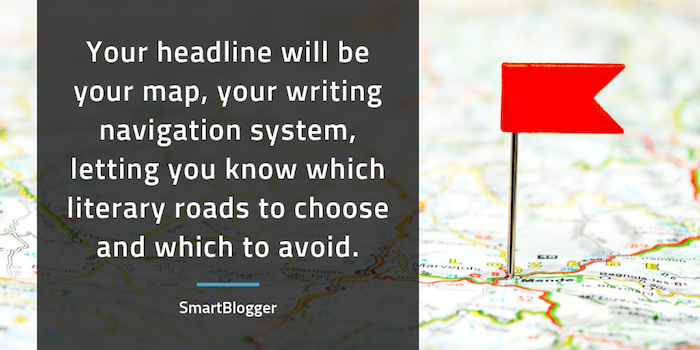
Your blog title will be your map, your writing navigation system, letting you know which literary roads to choose and which to avoid so that readers reach the intended destination as easily and efficiently as possible.
Follow these 8 rules to craft your killer headline:
Headline Rule #1. Pick a Mouth-Watering Topic
Want your blog post to get opened?
Then your headline must promise readers the very answer to whatever is tormenting them. The thing that keeps them up at night.
Your headline should not promise them a trip to the moon and back — readers are way too swift for such shenanigans. Keep the benefit specific and narrow, and readers will feel compelled to click and get the solution to what’s bugging them.
How do you find out what’s bugging your readers? How do you know which of your many blog post idea (we know, you have many) should be pursued?
Research:
- Review comments on your posts and on posts of other sites in your niche.
- Send your subscribers surveys asking them what their greatest struggles are.
- Use tools like BuzzSumo to find out what the most popular posts in your niche are (which gives insight into your target readers’ needs).
- Read the reviews of books in your niche on Amazon (you’ll find a gold mine of feedback to explore).
You have one responsibility as a blogger — yup, just one. And that is to serve your target audience. The better you know them, the better you serve.
Before you know it, you’ll know them so intimately they’ll feel like you’re reading their minds, and your headlines will reflect that.
Example:
Let’s say you’re in the self-improvement space and you wrote the headline below:
How to Create an Amazing Life
This headline is so broad it’s unlikely to grab readers’ attention. No one loses sleep over “wanting to create an amazing life.” They lose sleep over specific aspects of their lives that have left them unfulfilled.
So you are better off narrowing in on something specific that’s bugging your readers, such as:
How to Boldly Pursue Your Dreams Even if You’re Scared and Insecure
Narrowing in on something specific makes readers feel like you have the answers they’re looking for.
Headline Rule #2. Steal from the Pros
Okay, you’ve done your research and you know exactly what your readers need. Now it’s time to turn your topic into a killer headline.
Want a pro tip for mastering the art of writing headlines?
Steal.
Not in the unethical way. In the smart and efficient way.
Decades of copywriting and advertising research have revealed the types of headlines that have proven to be successful. The types of headlines that zap readers out of their info-overload comas and compel them to open. Why mess with that research?
If you want your headlines to grab readers, stick with what works.
No, your headlines don’t need to sound like they came straight from BuzzFeed. They can reflect your voice and style.
But until your writing skills match Jon Morrow’s, let the proven templates be your guide (how do you think he got so good at writing headlines?).
Blogging is hard enough, so if you have templates at your fingertips, why not use them?
The easiest templates to start with? “How to” headlines and list post headlines. They are classics and they work. In fact, 75% of Smart Blogger’s most popular posts use these formats.
Examples:
Here are a number of Smart Blogger headlines that follow the “how to” and list post templates.
“How to” Headlines:
- How to Start a Blog: Easy, Step-by-Step Guide for Beginners
- How to Make Money Writing: 5 Ways to Get Paid to Write in 2024
- How to Make Money Blogging (Free Guide for 2024)
List Post Headlines:
- 21 Dumb Mistakes to Avoid When Writing Your First E-book
- The 5 Best Free Blogging Platforms in 2024 (100% Unbiased)
- Writer’s Block: 27 Ways to Overcome It Forever
- 8 Best Free WordPress Themes of 2024 (Chosen by Experts)
- 12 Blogging Tips for Beginners (+ Lots of Free Resources)
- 4 Best Gifts for Writers: Ideas to Fit Any Budget (Even Yours)
Headline Rule #3. Engage Your Senses
Vague headlines leave readers feeling empty. Tangible headlines leave them feeling understood.
How do you create tangible headlines?
Put yourself in the shoes of your potential reader.
How do they feel? What do they see, taste, or smell? What do they hear?
Engage all of your senses by using sensory words. The more your headline gives voice to their exact experience, the more they’ll feel like your quality content was written for them.
Example:
Let’s say you blog about health and wellness, and you wrote a headline called:
5 Steps to Take When a Migraine Hits
This headline follows a proven list post formula, and it narrows in on something that’s bugging readers. All in all, it’s not too bad.
But it could be even more concrete.
To step it up a notch, put yourselves in the shoes of your readers. Think about exactly what they’re experiencing.
Perhaps that would lead you to the following:
5 Ways to Soothe Pounding and Blinding Migraines
If you suffer from migraines, there’s no way you could resist clicking such a headline.
Headline Rule #4. Tease, Don’t Satisfy
A common mistake you may not even realize you’re making?
Giving away too much in your headlines.
Your headlines should lure readers in like a literary temptress. They should catch readers’ attention and invoke their curiosity, not give a solution.
Give a solution in your headline and readers feel no need to go any further — they’re bored by the very thought of your post.
When this happens, not only do you lose but your readers lose as well, as they trade the richness of your perfect blog post’s advice for the quick fix offered by the headline.
Example:
Let’s say you blog about personal finance and you write the headline below:
How to Save for Retirement by Creating a Monthly Budget
Sadly, readers will see this and think they’ve got all the advice they need — if they want to save for retirement, they must create a monthly budget. No need to read more.
On the other hand, a possible revision could be:
How to Save for Retirement When You’re Living Paycheck to Paycheck
For anyone living paycheck to paycheck, this headline would pique their curiosity. Nothing is given away, it speaks to an audience with a very specific problem, and it promises a solution they’d love to get their hands on.
Headline Rule #5. Honor the Headline Commandment
When it comes to headlines, there is only one commandment you can never break:
“Thou shalt not deceive.”
This may seem obvious, but writers inadvertently do it all the time.
How?
They over-promise.
Big no-no. The content of your post must fully deliver on exactly what the headline promises.
If the post only delivers part of the solution, readers will feel misled and lose their trust in you.
Let’s never do that to them, yes?
Examples:
Let’s say you write a post called:
How to Live a Happy and Peaceful Life
But then the post only talks about following your dreams, which is really only one aspect of living a happy and peaceful life. Even though you didn’t intentionally deceive them, readers will feel shortchanged.
You might as well have written an over-the-top “clickbait” headline — your readers would have been as equally disappointed.
Another example…
Perhaps you write a post called:
5 Killer Ways to Attract New Clients to Your Coaching Business
But then the fifth way contains no useful advice and instead leads to a sales page to get the solution … no bueno.
Headline Rule #6. Trim the Fat
Want to overwhelm readers right from the start?
Fill your headline with weak and flabby words.
What are weak and flabby words? Empty, unnecessary words that add no real value. Instead, they create clunky phrasing and leave readers scratching their heads in confusion.
The mistake many bloggers make is writing headlines the way they speak. While that’s okay when you write the post (to a certain extent), when you write headlines that way, it waters them down.
You want your headlines to be as ruthlessly concise and powerful as possible. So chop out weak words and throw in power words (if appropriate).
Examples:
Let’s say you draft the following headline:
How to Find It In Your Heart to Forgive Someone Even if They’ve Hurt You Really Badly
There are just so many words! We can cut them down as follows:
How to Forgive Someone Who Hurt You Badly
We can then add some power to it:
How to Forgive a Soul-Crushing Betrayal
Much better.
Another Example:
Here’s a mouthful:
How to Stop Being Overly Doubtful of Yourself So You Can Finally Begin to Pursue Your Wildest Dreams
My head is spinning. This can be cut down to:
How to Stop Doubting Yourself and Pursue Your Wildest Dreams
We could even make it more tangible and powerful:
How to End Paralyzing Doubts and Conquer Your Wildest Dreams
Nice and trim, but packs a punch.
Headline Rule #7. Don’t Be a Smarty-Pants
Your headline should make sense to all readers no matter where they’re coming from or in what context they’re approaching your post.
They shouldn’t have to guess what the benefit is. After all, you’re supposed to be reading their minds, not the other way around.
So you’ll want to avoid using metaphors (unless their meaning is painfully obvious), jargon, rhymes, made-up terms, or anything that tries to be overly clever or complicated when drafting your headlines.
Examples:
Where to begin with this one:
How to Be Happy Without Acting Sappy
A headline like this tries to be too clever — readers don’t give two hoots about not acting sappy, obviously. Don’t prioritize cute tactics like rhyming (or even alliteration) over-delivering clear benefits in your headlines.
How to Raise a Child That Is the Apple of Your Eye
A headline like this is also trying to be too clever. “Apple of Your Eye” is a common metaphor readers are likely familiar with, but there’s no concrete benefit being offered here. A headline must always contain a strong benefit, not a cute phrase.
How to Follow the Path of Glory to Your Success
No clue what this means … and I just wrote it. If there isn’t a singular and clear interpretation of what the headline’s benefit is, it’s trying too hard. So save the metaphors for the actual post where they will (hopefully) make more sense.
How to Stop Treating Love Like a Captive Animal
Perhaps you effectively explain in the post how people treat love like a captive animal, and it may make for a great analogy, but readers scanning headlines will have no clue why they should stop to read this, and so they likely won’t.
Headline Rule #8. Rock Your Style
The more consistent you are with your audience, the more trust they’ll feel for you.
If you generally keep your headlines pretty simple and then suddenly write one jam-packed with power words, your readers will feel confused.
The more you write, the more of a writing style you’ll develop. Once you determine what that style is, use it consistently (or make slow and gradual changes to it if necessary) so your audience learns and trusts your brand.
Example:
If most of your headlines read like this:
- How to Live With Courage
- How to Overcome Social Anxiety
- How to Confidently Embrace Uncertainty
Then you might not want to suddenly write a headline that reads:
- How to Brazenly Squash the Agonizing Anxiety That Is Plaguing Your Life
Your readers will think your blog got hacked!
How to Write a Headline: Bonus Tip
When writing a headline, try crafting 5–10 different versions of the same headline.
The more you play with the words, the better you will get at creating clear, concise, and curiosity-invoking headlines that readers cannot resist.
Editor’s Note:
I’d be remiss if I didn’t discuss a question we hear often:
“How long/short should my headline be?”
Ever notice how some headlines in SERPs (search engine results pages) are truncated?
It’s based on your headline’s width in pixels (a free tool like SERPsim will show your headline’s width), but as a general rule:
At right around 60 characters, Google will cut off your headline.
Since a truncated headline can result in fewer people clicking your link in the search engine results, it’s a common SEO practice to keep your headlines 60 characters or less.
Of course, things are never that easy.
In a recent study, Brian Dean of Backlinko found that longer (14-17 words) headlines generated more shares on social media than shorter headlines.
(76.7% more social shares, to be exact.)
As with all things, your mileage may vary.
2. Write an Introduction That Grabs and Seduces

You’ve lured readers in with your headline. Now you’ve got to keep them.
No easy task, my friend.
Readers are fickle. Known to take a quick glance and then vanish from your online sanctuary, lickety-split!
You must fight to keep them there, and the way you craft your introduction plays a huge role in their browsing commitment.
Follow these rules to craft an introduction that captivates your readers:
Introduction Rule #1. Slip into Their Shoes
A common mistake that reeks of amateur blogging?
Trying to sound too academic in your blog openings.
You know, those posts that start like this:
“Research has proven that 92% of people fail to achieve their goals because they are unable to create and stick to habits that support those goals …”
Don’t get me wrong — as a lawyer, I value solid research. But in the blogging context, this approach bores readers. If you want to captivate instead of bore, you must make readers feel like you’re reading their minds.
A powerful way to achieve this?
Empathy.
Step into the shoes of your target audience and write from their perspective. Show them you understand exactly what they’re going through.
After all, you likely struggled with the very topic you’re writing about and learned how to overcome it. We teach what we most wanted to learn, right?
So show readers that you “get it.” You’re not some corporate slog, you’re in it with them, fighting the good fight and sharing the tools that brought you to the other side.
Example:
This introduction is a masterclass in empathy:
Do you feel that?
That little tugging sensation on your heart?
You’re not sure what, but something is pulling you to change. Not in a confess-your-sins-oh-ye-sinners way, but to shift directions, to embrace your calling, to finally do what you were put here to do:
Write.
You feel the ideas inside you. You sense them straining to escape. You know your job is to set them free, firing them like a cannon into a world in desperate need of them.
But you’re afraid.
You’re afraid of quitting your job and living without a safety net. You’re afraid of the concerned, disapproving looks your friends will give you when you tell them you’re giving it all up to write for a living. You’re afraid of not having enough money for food, of the power being cut off, of watching your family shivering and hungry, all because of your “selfishness”.
And most of all?
You’re afraid you’re wrong about yourself.
As writers, we all share the deep longing to embrace our calling and express our ideas, but we also share the fears that so often sabotage those longings — the fear that we don’t have what it takes, that we’ll crash and burn, and that our dreams are just that — dreams.
In his introduction, Jon addresses all those longings and fears and immediately makes you feel like he gets you so intimately, it’s almost creepy.
Creepy, but effective.
Introduction Rule #2. Get into Character
If you want to captivate readers, you must trigger their emotions.
So as you sit down to write, think of the feelings you want them to experience:
Fear, anger, sadness, hope, joy, disgust, shame, comfort, love, courage, and so on.
Then get into character and feel them yourself as you write, and your words will read with undeniable authenticity.
When Lin-Manuel Miranda wrote the heartbreaking lyrics in Hamilton that have left tears on the faces of millions, it was his eyes that first shed tears as he put his pen to paper.
So play with your emotions. Map out the emotional journey you’re taking readers on, and infuse those feelings into your writing. Feel what you want your audience to feel and your words will exude those emotions.
This tip applies to your whole post, but in no place is triggering your audience’s emotions more important than your introduction.
You feel me? 🙂
Example:
I once wrote an emotional post about my two little girls which addressed how delicate their emotions are, as well as my own vulnerabilities and my longing to give them the patience, presence, and love they deserve.
Here’s a portion of it:
I told my three-year old daughter as we stood outside the car in her school parking lot, the rain pouring down on us as she sobbed breathlessly in my arms.
She didn’t want to go in the car. She just wanted me to stand there, holding her. And I didn’t want to rush her, or tell her to stop crying.
“I’ll hold you for as long as it takes.”
I felt that longing intensely and definitely shed some tears as I wrote the introduction. The feedback I got from readers was that they felt the same intensity, and even cried as well.
When we write, our feelings seep into our words.
Introduction Rule #3. Lure Readers Down the Page
Want readers to commit to your post?
Accelerate their experience. Lure them down the page.
The faster they get pulled down, the more committed they’ll feel.
Too many bumps in the road early on, and off track they go, never to return.
Here are three writing tips to use in your intros to lure readers down the page:
#1. Open With a Short Sentence or Question
Kind of like how I opened this section. 🙂
This is how all of Smart Blogger’s posts open, and for good reason. It’s a copywriting technique proven to pull readers in.
Start a post with a long clunky paragraph and they’ll feel exhausted just looking at it.
#2. Take a Knife to Your Words
Slash as many words as possible.
If the first draft of your introduction is 200 words, try cutting it down to 100. The more you practice this, the more efficient your blog writing process becomes.
And when you write efficiently, your words have power. That power will grab your readers.
#3. Set the Rhythm
All writing has a pace and rhythm.
You want your introduction’s pace and beat to be somewhat quick. You can slow things down later.
How do you achieve this?
- Use short sentences. Even sentence fragments (totally okay).
- Write short paragraphs. Make your paragraphs no more than one to three sentences long.
- Use delayed transitions to weave sentences together.
- Make each sentence and paragraph lure readers into the one that follows.
- Read the post out loud to check the flow. Are things moving forward smoothly or stalling?
The best writers, like the best music composers, take readers on a journey. Fast and slow, loud and soft, urgency and ease.
The more you pay attention to this, the more rhythm you’ll infuse into your words.
Example:
Shane Arthur sends readers’ eyes flying down the page by using crisp sentences and short paragraphs to create a fast rhythm:
You’re not stupid.
You know what writing is truly about.
It’s a never-ending battle for your readers’ attention.
Every sentence is a link in a taut chain that connects your headline to your conclusion.
And you are just one weak sentence away from losing your reader forever.
He then appropriately slows things down in the section that follows with longer sentences. A masterful composition!
Introduction Rule #4. Make Them Beg
Want readers begging for your solutions?
Add a little fear to your opening.
What are readers worried about? Do they know what will happen if they don’t solve the problem the post is addressing? What is the worst-case scenario?
Bring those fears to the surface. Expose them.
By doing so, not only will readers feel a camaraderie with you (because you understand their fears, so clearly you’ve tip-toed through the dark side yourself), but they’ll feel more eager than ever for the solution you present.
We all have fears. We think we need to hide them, but the more we give voice to them, the easier they are to set free.
Do that for your readers.
Example:
In his introduction, Glen Long brilliantly taps into the fear of failure all writers experience by addressing the dream of making a living as a writer and then quickly smothering that dream with the doubts that creep up at the mere thought of it:
So, who knows? Maybe the doubters are right. Maybe you are naive to think you could earn a living doing something you love, instead of something you just tolerate.
The fear of failure is painful, yes. But giving voice to it is validating and makes readers eager for the solutions that will set that fear free.
Introduction Rule #5. Hint at the Promised Land
Finally, as you wrap up your intro, hint at the promised land.
The place readers will get to when they master your methods. The destination your post promises to take them.
But whatever you do, do not give it all away. Just one sentence that says too much satisfies your readers enough to send them clicking away.
Why?
Because readers bore easily. You must keep them on their toes.
And the key point of an introduction is not to give answers, it’s to set the stage for all the hearty advice your post will provide.
Example:
In the introduction to Meera Kothand’s post, she addressed a problem all new bloggers face: How do you get to know your audience when you don’t have one yet?
She goes on to talk about the big mistake many of them make (making assumptions) and why that’s ineffective. Then, she uses the simplest phrase to hint at a solution:
That kind of guessing is like throwing darts blindfolded and hoping you hit the bull’s eye.
Sometimes it works. Usually, it doesn’t.
Fortunately, there’s another way…
How could anyone not want to keep reading?
How to Write an Introduction: Bonus Tip
When writing an introduction, try drafting two completely different versions approached from different angles and triggering different emotions.
Doing so will highlight the techniques and emotions that work best for both your audience and the content of your post.
Editor’s Note:
A word of caution:
No matter how eloquent your words…
No matter how powerful your prose…
If your introduction doesn’t satisfy search intent, readers will click the “back” button and never return.
What’s search intent?
It’s the purpose behind the Google search.
If someone searches for “how to lose weight” in Google, they’re expecting search results that will help them lose weight.
If they click a headline that reads “7 Easy Tips For Losing Weight Fast”, and the post begins with an amusing Nicolas Cage anecdote, there’s a good chance they will leave — never getting to read the rest of the post, which is filled with weight loss wisdom.
And when they leave, what they’re essentially telling Google is this:
“At no point in your rambling, incoherent response were you even close to anything that could be considered a rational thought. Everyone in this room is now dumber for having listened to it. I award you no points, and may God have mercy on your soul.”
And Google will respond by ranking your post lower in its search results.
Search intent is a big part of SEO (search engine optimization). When we do keyword research here at Smart Blogger, figuring out the relevant keyword phrase’s intent is one of the first things we do. It shapes our headline, meta description, introduction, word count, and more.
The ins and outs of mastering it would be an article all by itself, so we’ll simply say this:
Taking the time to analyze the results in Google so you have a solid handle on why people enter the particular query your blog post will be targeting is time well spent. Figure out the intent, and then make sure your intro matches it.
3. Deliver Advice That’s Easy to Consume and Impossible to Ignore

Okay, you’re doing great.
You got readers to click on your headline, you lured them down the page with your intro, and now it’s time to deliver on all that you’ve promised.
If you want readers to love you and look forward to every good blog post you write, you’ll over-deliver.
If you want them to take a quick look and vanish for good, you’ll under-deliver.
The choice is yours.
Use the guide below to deliver valuable and easy-to-consume advice:
Content Rule #1. Add Pitstops
Why? Because readers are scanners.
They have no choice. There’s a behemoth amount of content at their fingertips, and not all of it is good.
And so they scan (as do you, I’m sure).
Subheadings are your chance to prove to readers that you have valuable content. To keep luring them back into your post, when their instinct is to leave.
Blogging is a battle, remember?
Keep these four tips in mind when drafting your subheads:
#1. Add a Subhead Every Few Paragraphs
Sprinkle subheaders throughout your post.
Why? Because they gently guide readers along the route your post is heading, making their experience feel clear, easy and enjoyable.
And never forget, your blog posts are all about your readers’ experience.
If readers see too much text when they’re scanning without enough pit stops, they’ll feel overwhelmed. It’s like getting on a bus tour and being told there will be no bathroom breaks … oh, the anxiety!
Example:
Every single post on Smart Blogger.
Seriously.
That’s how important this is.
#2. Avoid the 3 Subhead Blunders That Make Readers Bounce
Subheads have the same function as headlines; they must make readers curious so they keep reading. So you should follow similar rules when drafting them and avoid the following common blunders:
- The Plain Label Subhead: In case it bears repeating, never bore your readers. Labels are boring. Treat your subheads like mini-headlines and make sure they invoke curiosity.
- The Spoiler Subhead: Don’t give away too much in your subhead. If you do, readers will feel no compulsion to read the rest of your text.
- The Cryptic Subhead: Don’t try to be too clever. Readers don’t like to play guessing games. Adding curiosity should never come at the expense of clarity.
Example:
Let’s say you’re writing a post about the impact sleep has on anxiety levels and you include the following subheads:
- The Importance of Sleep
- Creating a Steady Sleeping Routine Will Reduce Anxiety
- Refuse the Roast and Catch More Z’s
See how the first subhead is way too plain, the second gives too much away, and the third, well, it probably made no sense to you, right?
The subheads below would do a better job at grabbing readers:
- The Easiest Way to Reduce Daily Anxiety
- How to Beat Anxiety Without Resorting to Medication
- The One Thing You Must Avoid to Sleep Better
#3. Compare Each Subhead to Your Main Headline
Each subhead should clearly deliver on the overall headline of your post.
Again, if you’re viewing subheads as pit stops, they must all lead to the ultimate destination — what was promised by your headline.
If the subheads get off track and move away from that destination, readers are left feeling lost and confused.
In that case, either the subheads need to change or the headline needs rethinking.
Example:
Say you’re writing a post called “How to Silence Your Nagging Inner Critic” and you include the following subheads:
- Observe Your Thoughts
- Prove Yourself Wrong
- Ask Yourself This Powerful Question
- Bravely Quit Your Day Job
The fourth subhead’s sudden twist in topic is jarring. It does not deliver on the overall headline, which had nothing to do with your day job.
Perhaps you intended all along for the post to be about not letting doubts stop you from following your dreams and quitting your day job, but readers scanning subheads will not understand that.
They will simply feel confused.
#4. Follow a Format
If you are listing various “ways,” “steps,” “methods,” “signs,” etc., to achieve what the headline of the post promises, keep the format consistent.
If you don’t, the post comes across as unpolished. Bloggers overlook this all the time, but it’s easy to fix once you’re aware of it.
If you separate your subheads from the post and list them back to back, you can see if any stray from the course.
Example:
Say your post is called “12 Ways to Cure Insomnia” and you have a subhead for each of the 12 ways. You’ll want those subheads to follow a consistent format.
Let’s say your first few subheads read as follows:
- Exercise Every Morning
- Avoid Caffeine Like the Plague
- Wake Up at the Same Time Everyday
- There is Nothing More Sleep-Inducing Than Nighttime Meditation
Something there feel a little off?
The first three subheads start with an action verb instructing readers what to do. They are also fairly consistent in length.
But then the fourth subhead suddenly changes the format and breaks the flow. It doesn’t start with a verb and it’s much longer than the others.
This inconsistency may seem fairly innocent, but it’s distracting to readers.
Content Rule #2. Unleash the Unexpected
Let’s face it, readers today are info-holics. We all are.
So tired old advice isn’t going to cut it. Your post must be unique, bold, and eye-opening.
My advice? List each main point and see if you can add a unique perspective, experience, or twist to them. Something readers aren’t expecting.
What belief systems have you learned to challenge? What do you know that most people don’t? How can you shed new light on an old problem? What methods do you use that others won’t know about?
You don’t want to go overboard just for the sake of adding shock value. Your advice must be authentic and truly helpful. But regurgitating old advice doesn’t challenge you as a writer, nor does it enlighten your audience.
So pour your readers a little espresso for their info-hangover by delivering the unexpected.
Example:
Countless articles have been written about blogging, but how many have called you out for being dumb or told you to replace your friends?!
Jon does just that by knocking you over the head with some hard truth bombs about what it takes to make it as a blogger.
Content Rule #3. Follow a Formula
Notice how this post follows a pretty consistent formula?
Each section is relatively similar in length. Every subhead follows a pattern. Each section ends with an example.
The more consistency you weave into your posts, the better the reader’s experience.
Let’s say you write a list post covering five steps to achieve something. If the first step is 500 words, the second and third steps are 100 words, the fourth step is 200 words and the fifth step is 400 words, it looks sloppy. As though you didn’t bother to proofread it before hitting publish.
Your readers deserve the best, and minor details like this matter as they affect the fluidity of their experience.
Want to go even more pro? Look at the beginning, middle, and end of each section you write, and create a guiding formula. Perhaps you start each section with a bold statement or personal experience. Then you flesh out your advice in the middle. And then you end each section with a one-sentence call to action.
The more formulas you add to your posts, the easier they are to write and the more they look like polished works of art.
Example:
In his post on getting traffic from Twitter, Brian Honigman uses hashtags for each subhead, each section is consistent in length, and each includes a graphic.
Readers know exactly what to expect from each section, making for a fluid reading experience.
Content Rule #4. Be Ridiculously Generous
Many bloggers worry about giving away too much in their posts. After all, they want readers to sign up for their paid coaching calls or products.
So they hold back, barely skimming the surface of their advice.
Truthfully, if you’re not generous with your readers in your posts, they won’t get a good impression of your paid products.
Don’t hold back on your readers.
Fully work through the problem with them. Give them complete solutions and powerful advice. Wow them with your generosity and they will stick around as loyal readers and customers.
Example:
Want to learn everything there is to know about affiliate marketing?
Holy smokes. At 10,000 words, that insanely generous post by Leanne Regalla is basically a textbook on the subject, and reader comments praise it as such. (Let’s all bookmark this one, yes?)
A post of this magnitude is quite an undertaking, but don’t let it scare you. You can also wow your audience with your generosity and thoughtfulness in a 1,000-word post.
Content Rule #5. Start and End Strong
Just as your introduction and conclusion should grab readers, you want the main body of your post to start and end strong as well.
Of course, every section should have great content, but if you’re offering five ways to achieve something, save your absolute best tips for the first and fifth ways. The first way will grab your readers’ attention, and the fifth way will leave them feeling fully satisfied.
On the other hand, if each tip successively decreases in value, readers will feel like your post is deflating. And their excitement will deflate with it.
Let’s leave readers feeling pumped when they finish your post.
Example:
Linda Formichelli gives ten crafty ways to write 1,000 words per hour.
While all ten ways are excellent, I’d argue that the first (about writing under the pressure of a full bladder) and last (about gambling with your reputation) are the most bold and attention-grabbing (bathroom break, anyone?).
Writing a Blog Post: Bonus Tip
Before writing the main sections of your post, flesh out a blog post outline to nail each key point.
The clearer and more simplified your blog post outline is, the more clarity and conviction your post will have.
4. Close with a Motivational Bang

We’re almost at the finish line! It’s time to close your post with a bang.
This is where you rally behind your readers. Show them that you believe in them.
Make them believe they can achieve the goal promised by your headline (because after reading your generous advice, they certainly can).
Follow these rules when crafting your motivational conclusion:
Conclusion Rule #1. Give Your Readers a Pep Talk
Motivate your readers.
Show them how far they’ve come, what they’re capable of, and what life will look like once they’ve implemented your advice.
Give them the pep talk you longed for when you were struggling with the topic your post presents.
Empower them by raising your expectations of them. They can’t just read your post and pretend it never happened — they must take action. Immediately.
Make them see that no matter what they’ve experienced or how hard they’ve struggled, their time is now.
Example:
In this post’s conclusion, Jon uses all he’s had to overcome in life to show readers that they have no excuses: no matter hard things get, they can accomplish anything they set their minds to.
He encourages readers by letting them know that he believes in them and then he raises his expectations of them by telling them they need to get started … “right freaking now.”
By the time you’re done reading the conclusion, you feel like you can conquer just about anything!
Conclusion Rule #2. Avoid New Information
A common mistake many bloggers make?
Suddenly inserting new information or tips in their conclusions.
It’s like reaching the last ten minutes of a spellbinding movie. You’re on pins and needles waiting to see how it ends, and suddenly a new character is introduced. What the … ?!
It’s jarring. Don’t do that to your readers.
Example:
In his conclusion, Robert van Tongeren motivates you to repurpose old blog posts by comparing them to epic musical classics; if they disappeared into obscurity simply because they’re old, we’d all be at a great loss.
Imagine if in the midst of such a conclusion, Robert quickly threw in one more way to repurpose content, or one small caveat to his post’s advice, or one more general tip to keep in mind?
It would throw the whole closing off and leave readers feeling ruffled instead of jamming to Bohemian Rhapsody.
How to Write a Conclusion: Bonus Tip
When writing your conclusion, put yourself back in the shoes of your potential readers.
What will their lives be like if they accomplish the advice in your post? How will they feel?
The more you can hone in on your readers’ point of view, the more you can motivate them to take action.
Editor’s Note:
Too many bloggers put too little thought into their closings.
That’s a shame.
Let’s face it…
Most people don’t read 100% of our posts. Heck, most people don’t even read half.
So how do we reward the precious few who read and absorbed the words we poured our heart and soul into?
With a closing we whipped together in 20 seconds.
Someone who makes it to the end of your post is primed.
They trust you. They like you. They want you to tell them what to do next.
So tell them.
Don’t waste this opportunity.
5. Polish Your Post So It’s Smoother Than a Slip ‘n Slide

Phew! You’ve written your post. Next up?
Take a well-deserved break. Step away for a day or more so you can come back to it with fresh eyes.
Once you’re ready, it’s time to do some editing. I know, the mind reels that there’s more work to do!
But editing your post is essential. If your post doesn’t provide a smooth reading experience, your reader will lose attention and bail.
Use this checklist when you’re ready to edit your post:
- Take a Knife to It. Slash all unnecessary words, sentences, paragraphs, stories, etc. Include only what is absolutely essential to convey your message. Nothing more.
- Motivate, Don’t Lecture. Tweak any statements that hint of being the condescending professor. Make readers feel like you’re on their side and dedicated to their success (because you are).
- Add Emotion. Infuse your writing with passion, energy, and enthusiasm. If you’re bored by your blog topic, readers will be too.
- Make it Easy on the Eye. Break up any large paragraphs (2–5 sentences maximum is your goal) and run-on sentences.
- Break it Down. Clarify overly complicated wording. If you can’t say it simply, don’t write it. You don’t want to confuse your readers.
- Speak Their Language. Add examples or metaphors to make complex ideas feel more tangible and easier to digest.
- Check Yourself. Remove any contradictory statements or repetitive ideas (trust me, they’re there).
- Don’t Yo-Yo. Ensure each sentence, paragraph and section drives the post forward toward the destination promised by the headline (no side routes or backtracking).
- Be Smooth. Make each sentence and paragraph flow seamlessly into the next. Each sentence should be completely dependent on the ones before and after it or the transitions will feel choppy.
- Avoid Sharp Turns. Adjust any abrupt changes in topic. They’re jarring to readers.
- Keep It Real. Don’t mimic styles that don’t come naturally to you. The more you write, the more you’ll find your authentic writing voice.
- Add Highlights. Use bold and italics to add stress where appropriate (but do so sparingly).
- Shoot Bullets. Use bullet points to group related topic ideas and make them more digestible.
- Spark the Senses. Be specific and concrete (describe things readers can see, feel, hear, smell or taste). Avoid abstract statements.
- Be Firm. Avoid words like “might,” “may,” “possibly” and “perhaps” when delivering your advice.
- Give Some Eye Candy. They say a picture is worth a thousand words. Add relevant images, screenshots, and infographics to your blog content.
- Respect Nature. Put things in their natural order (e.g., past to present, young to old, small to large, breakfast to dinner, etc.).
- Be Consistent. Make sure all points in a list belong to the same category; a list of steps should only list steps, a list of things should only list things, etc. This might sound like common sense, but this rule gets broken often.
- Don’t Be Lazy. Ensure all the necessary information is contained within the post itself. (External links should only provide supplemental information. A reader shouldn’t have to click a link to comprehend your post.)
- Kill the Weak. Eliminate weak and flabby words. Replace weak verbs (e.g., “she went”) with more concrete, visceral verbs (“she walked”), replace passive voice (e.g., “he was pushing”) with active voice (e.g., “he pushed”) and replace weak adjectives (e.g., “good”) with strong adjectives (e.g., “wonderful”).
- Feel the Beat. Be mindful of the pace and rhythm of each section. Speed things up or add some punch with crisp, short sentences. Slow things down with longer explanations. Good writing uses both.
- Do the Obvious. Fix any typos, spelling mistakes, or grammar mistakes (you can use grammar checkers like Grammarly and Hemingway App).
- Be Honest. Give credit where due.
How to Edit a Blog Post: Bonus Tip
A great way to self-edit your posts is to read them out loud.
Doing so will help you catch many of the issues listed above, particularly things like overly complicated wording, run-on sentences and choppy rhythm.
Win the Battle for Your Reader’s Attention
Blogging is a battle.
A war to get your ideas the attention they deserve.
Your enemy? The dizzying array of online distractions that devour your readers’ attention.
This battle is not for the faint of heart.
Along your blogging journey, there are so many learning curves. Blogging platforms and plugins you’ll need to install. Social media networks you’ll need to employ. Content marketing techniques you’ll need to try.
But none of that stuff matters if you’re drowning your ideas in amateur writing. You might as well lay your sword down in defeat. Readers don’t have time for amateurs.
So before you venture any further down the blogging rabbit hole, you better make sure you know how to write a blog post like a pro.
Skip that step, and nothing can save you. Your battle is lost.
The good news is, writing good blog posts is a skill you can learn. And it’s one you must learn.
You have powerful words and ideas that can transform readers’ lives. Those ideas are worth fighting for.
So when you’re ready to enter the arena, arm yourself with this ultimate guide and fight the good fight.
Your readers are counting on you.


Hi Liz,
I must say, I am totally convinced to read the complete article. I have completed the step 1 but will complete the other soon. The main things most of the beginner bloggers think that topic is already covered by leaders, how i compete with them?
So this guide will help them to find the answer.
Good Read 🙂
Thanks Kuldeep, I’m glad you found this helpful!
Liz,
I have benefitted from your blogging wisdom as your student. This is a wonderful summary of things you have taught me — things we need to be reminded of. Thanks to you and to Jon for this post.
Also, if you chose the photo of Ste. Chapelle as the background to your “over deliver” statement — it’s the perfect illustration — did you know that? The French King who built that chapel had those walls of light created to meet the greatest challenge of Gothic architecture — to construct the highest possible walls of stained glass that could be created without crumbling. It has no rivals on that score.
This is one of the best architectural illustrations of your point you could have chosen. Well written and well done!
Thank you so much, Kim! I learn so much from you as well!
The credit for that photo choice goes all to Heather on Jon’s team, she knows what she’s doing! 🙂
Liz!!!
So glad to see your post on here. It turned out amazing. My favorite points are tied to the idea of stealing and being simple. The number one mistake I see writers make is trying to be original, witty, and intelligent. People who think they’re above having to learn first principles always fail.
Kudos on using lickety-split in your post too. haha.
Off to share!
Thank you so much, Ayo! You have me cracking up. Thank you for noticing I used lickety-split, I was quite proud of that word choice 🙂
Hey Liz,
Wow!! Amazing guide… Thank you for putting it together! I’ll be sure to follow all these steps every time start writing my articles!!
Off to share right away!
-Nadeem
Thank you Nadeem, so glad you found it useful!
Fantastic post!
We have a website/blog and our way of motivating is by providing samples of Truth and Beauty. We do this through images, words, music, movies and wine! We blog every day so we try to keep it fairly succinct.
Although our structure is a little different, I find this post to be extremely helpful and look forward to future posts. Thank You!
–Shawn
Thanks, Shawn! So glad you found this useful
Hi Liz,
That was a great article. I will go back to it again. In fact, I’m going back to edit a post I thought was perfect…until I read yours. Glad I hadn’t published it quite yet. 🙂 Jan
Thanks, Jan! Glad you can refer to this when you write!
Hey Liz,
Some great stuff in here! I resonated a lot with Avoid New Information – I’m always doing that with my blog posts. Too many great statistics to pack in!
What made you decide to format this as a long-form document rather than separate posts? I would be concerned about people seeing the length of this bad boy and being put off!
Jack
Ha, yes, you might be right Jack! This bad boy was quite a writing project all on its own. But since it’s an “ultimate guide” I just couldn’t leave anything out 🙂
Hi Liz,
Thank you for this incredible guide! As a new blogger, I have learned so much in this generous post. And now I’m itching to write using the steps that you’ve outlined above! I have bookmarked this post and will be returning to this guide often.
Best,
Kat
Thanks so much, Kat! So glad this guide will be helpful to you as you write 🙂
You’re very welcome 🙂
Thank you Liz for this overwhelmingly important information. This is really called “ultimate” for a reason. 🙂
Thanks so much, Mikel 🙂
Hey Liz, wonderful to read your post again. This article is an awesome checklist and will save us the trouble of Checking out the Blog Launch Formula video where Glen gave a kick ass presentation on the same topic. This is also a great resource for training new writers. Bookmarking this.
Thanks Peter! I know you know most of these tricks already! I haven’t seen that video but everything I know I’ve learned from Glen 🙂
Hi, Liz. I´ve been reading Jon´s posts for a while now. Yep, he´s the master of empathy. Undoubtedly. And I found my courage from his articles to start blogging again.
But as a loyal follower I read all the Smartblogger´s blog posts and you know what I´ve noticed? Jon has an incredibly sharp eye to choose his co-writers. Cause´ they are as talented and skillful as he is.
In fact, your guide, Liz, has triggered me to write this comment. Which, by the way, is my first one not only here, but ever :).
I know well how much time and effort it took to put this guide together. It seems so smooth, playful and professional, but in reality there`s loads of work hidden under the playfulness.
So I simply say: thank you, Liz!
I now bo back to my blog posts and work harder to be worthy of this guide, some day 🙂
Cheers, Sigrid
Thank you so much for these kind words, Sigrid! I can see just from your comment that you are a talented writer 🙂 And you are right about the amount of work that underlies the playfulness! Your words are very much appreciated!
Ups, I left my photo behind, that´s fixed now 🙂
Sigrid
Hey Liz, what can I say except… Boom! You nailed it. Your post is an amazing and generous resource for bloggers. Every blogger should bookmark this goldmine of advice. I’ll stop there before Jon deletes it 😉
Thanks so much, Miranda! 🙂
Hi Liz,
Wow amazing post with tons of actionable advice that will help us become better writers. I definitely took away a lot of gold nuggets just from reading it.
I definitely need help crafting better headlines. This is something that I’ve been working on to get people to my blog. I’m going to check out the 52 Headline hacks to see what else I can learn.
Also, love the tip of closing with a motivational bang. Definitely, makes a lot of sense and will make your reader feel better.
Thanks again Liz for these useful tips. I’ve bookmarked this page so I can refer to it when I write my next blog post.
Have a great day!
– Susan
Thank you Susan! You will love Jon’s Headline Hacks!
Even as someone who has written 100’s of blog posts over the years I found the suggestion and tips here great. I know for sure my headlines leave room for improvement!
Keep up the good work.
Thanks Bradley! So glad this was helpful to you!
This is a very informative article. Great hints. Bookmarking it. Thanks for sharing this information.
You’re very welcome, John!
This much too long piece (especially in 2017) seems to be aimed at persons who have no writing experience. I have been a freelance and full-time journalist for more than 20 years. I have written/edited a wide variety of things, such as news stories, articles, newsletter copy, blog/web site copy, captions, subheads, and headlines.
I have learned that conciseness, especially now, is very important since many persons now have very short attention spans. This piece needs a lot of editing. I probably could reduce the piece by at least 25%.
The people who are passionate about your topic (i.e. your ideal audience) will happily sit down and read an in-depth guide like this, as the other comments here demonstrate. This is not meant as a read-it-and-leave-it fluff piece. This is a resource for people to bookmark and use when they sit down to write their posts. The audience we’re targeting will appreciate it. But to each their own.
Hey Robert I agree with you. This is not just a short ordinary blog but an in-depth guide. Maybe Paris Wyome didn’t have her reading glasses on!
I think Liz has done an excellent job. All new and seasoned writers need constant reminders on best practices when it comes to blogging.
I’m a newbie to blogging so I’m lapping all the information up. You can never be complacent in life about anything. Learning news skills and picking up great information helps you move forward.
So many thanks to Liz for her time and expertise.
I have been a subscriber to Jon Morrow’s blog and there is no denying that he is treasure trove when it comes to blogging and I admire his writing style. He hs this flair to combine words into a sort of music. And he uses simple, easy to understand words.
But what confuses me is that, while you guys are always talking about the short attention spans of people, your articles practically guarantee that when a reader gets to the last sentence, I’ll be damned if he can remember the first.
They’re just way too long. Maybe you should not describe the flower too superfluously.
Hi Liz,
Great tips, whenever i need to find a topic i research it on buzzsumo to see which one has potential to go viral.
Thanks Tony. Yes, BuzzSumo is a great tool!
Just a few thoughts about post length.
Yep, it´s likely possible to cut down all the Smartblogger`s posts (including this one), let´s say, into bullet-pointed lists. Or shorten them in some other way. So that people can just quickly jump in, get an answer and jump out. Within seconds.
But I`ve got a question.
Have you noticed one single ordinary-length post here in Smartblogger? I certainly haven´t. Why? Cause´ these articles here are not meant for ordinary people. They are not meant for get-my-results-quick-and-easy kind of people.
No.
They are meant for people who actually want to study, who are willing to put as much time and effort into reading these posts as the author put into creating. Moreover, they are meant for people who enjoy this particular writing style.
And then.
This article´s headline says Ultimate Guide. Headlines are supposed to deliver, right? And this one really does it by having a length of a mini course. Yet it´s not just the competition of who-can-write-longer-posts going on here, this is about actionable information. Yep, the competition is called who-can-write-most-actionable-and-thorough-posts.
That´s the reason I´m Smartblogger`s reader. Whatever question I might have about blogging, they provide me an answer. Thorough and actionable. With style 🙂
So I`ll take my time, make myself a nice cup of tea and start to read AND enjoy the posts.
Just like a good book.
So beautifully put, Sigrid! I cannot imagine a better description of Smart Blogger’s posts and audience. Thank you for sharing such an insightful and positive perspective!
Seriously..!! Unbelievable.. I never ever read this type of articles in my 3-year career. I m glad that I found this blog from online Junk. I started my profession as a writer but later I started online blogging. Now, I started my own blog as I recently quit my job. I purchased a Domain and WordPress hosting scottadlhochwriter.com and started making changes. I am really inspired by your blog @Liz and this blog is really helpful for me.
Thanks so much, Scott! And that’s very exciting, I wish you the absolute best with your new blog 🙂
hello sir,
I was wondering how to find and omit grammatical mistakes from articles. As a non-native English speaker, it’s hard to grab those bugs.
Grammarly and other proofreaders are ok but don’t give deep insights. So, the bugs remain.
Is there any alternative tool that does the job you know of? Or some guide you’ll like to suggest so I can brush up on my grammars?
I meant, the free version of those tools don’t give a deep insight. And I’m unable to get the paid version for some reason.
Hi Hasan,
I personally only know of Grammarly and Hemingway App. But I did find this article which lists a couple of other options you could check out – thewritelife.com/automatic-editing-tools/. If you read the comments section, readers also mention additional options and insights.
I hope that helps!
Gotta say that this post delivers on what it says. “The Ultimate Guide to writing a blogpost”. Wow. I’ve only been blogging for ~4 months and the difference between the post I wrote after reading this and before is almost staggering. This is what I produced based off of this post. http://many-wounds.com/how-to-change-my-life/ and before this http://many-wounds.com/genetics-luck-propaganda-youve-systematically-brainwashed-helpless/. Like I said, difference is staggering.
Wow, what a way to put things into action, Abhinav! And yes what a difference in the two posts! Excellent job.
Such a beauty! In a world where information is turning on us and has become toxic, it’s refreshing to read advice that offers clear, actionable steps.
Find out what your audience actually wants! Sounds obvious and yet so many of us just write about what we think is interesting.
Cheers Liz.
Thanks Drew! So glad you found the advice here to be clear and actionable.
So much so that I wrote an article yesterday and applied the points with a microscope. When it’s published I’ll share.
Hi Liz,
I think this is the best article i have come across for writing a blog post…you have really gave some useful tips to write some amazing blog post title…next time i am surely follow all these tips…thank you very very much Liz…this article has made my day..!!
Arvind
So glad to hear that, Arvind!
The title is the most important phase of a post and should be powerful and clear enough to attract visitors and bring traffic.
Hi Liz,
Thanks for the article. You are always informative to read. Always found something useful from your side since years.
Thank you!
Hi Liz
I Appreciate you for this post. All These Five Steps in a Guide for writing a blog post helped me a lot to write an effective and unique content for posting. Keep Posting this type of informative blogs for learning.
Thanks David!
Nice article, you have almost covered all the points that have to be considered while blogging. Thanks for sharing.
Thank you!
Thank for this post Liz, what an amazing resource!
It’s funny you mention giving too much away with this post that gives so much away – but it is so valuable, it only sparks my curiosity to read more from the site 🙂
Loved the part about making your subheads uniform with the theme of the post. Especially the part about not introducing new ideas in the conclusion. I’ve definitely been guilty of that.
So happy you feel that way, Blake! This site is a treasure trove of blogging wisdom 🙂
Great blog my friend 🙂
Thank you!
Awesome tips Liz! I have been a blogger for several years but I always have new things to learn! Lots of learning here in your article! I was wondering, how often should we publish new content?
Thanks Emmerey! Everyone has different opinions on how often to publish, I would suggest picking a schedule (whether weekly, monthly, etc.) and just trying to be consistent with that schedule so your audience knows what to expect.
Hi Liz! Thank you for responding and for the tips! 🙂
Oh, how I wish I found this blog post when I first started writing, haha! I spent so many hours trying (and failing) to create good blog posts – I’m sure this will help so many new bloggers.
I found that the subhead of my posts made the biggest difference so I can definitely vouch for you on that one.
Great post 🙂
Thank you Elise!
I loved your comprehensive post, which would have come in handy when I started blogging in 2008.
Headlines and subheads are important, but I can get stuck in my head and over analyze them (use the headline analyzer from Advanced Marketing Institute) for emotional value. Oh well. I guess that’s the accountant in me. 🙂
Thanks again for the post! I always refer people to the website because of the value the writers provide. The courses are great, too.
Thanks Amandah! Yes Jon’s site and courses are amazing 🙂
Hello Liz,
Fantastic article, I’ve been writing my own articles for about two months now. Before that, I had zero experience in blogging and writing. I read blogs how to guides online and tried my best.
I’ve improved quite a lot, I still need more experience and reading your article has given me more confidence in my writing. Thank you.
So glad to hear that, Giovanni!
Great article! I’m working on an putting together an ultimate guide post, and this sparked some ideas.
Hey Liz,
We know very well, every post start with a powerful headline, it is the mainthing which have potential to engage audience for maximum time on post. Here you have shown amazing way to craft a powerful headline for a superb post.
These are really great points and need to implement before crafting a headline for post. A perfect headline needs lot of research to make it outstanding to crawl on internet. Eventually, thanks for sharing your valuable tips with us.
With best wishes,
Amar kumar
Thank you for this article, this is what i needed and was searching for. I would like to start writing next summer and need tips like this. 🙂 Hope I will build a content that I will be later proud of.
Hey Liz,
This article is very amazing since i am a new blog writer it helped me a lot. Your article was a real learning exercise to me and also its giving me lot of boosts to write more.
Excellent read, your dedication shows in your content indeed. Great job! Quite a lot to take in, but most certainly worth applying. Learning to write high quality blog posts have a flip side to the coin, as online writing jobs become quite a favorite.
That’s a great point, Deon!
Nice read, it was a worth to read full article. It really represents the completeness of information that you have presented for every newbie blogger. Thanks for sharing such a nice topic.
Thanks for reading, Anveksha!
Writing a blog post that gets a real audience attention is a challenge, finding a mouth-watering topic is a real plus in writing a blog post. So I ‘ll give a +1 to the point choosing a good topic.
Hi Liz,
great stuff, my favorite part of this post is selecting a mouth-watering topic, proper topic selection helps you to engage more traffic.We should alway provide unique information to the reader of which they haven’t heard about it ever before.
Agreed Bhavesh! Thanks for reading.
Hey Liz, you wrote an incredibly detailed post on a familiar topic in a splendid manner. I like the fact that you have offered plenty of advice that’s either new to me or breaks the norm. I agree with you that headlines that have numbers in them perform better than non-numeric headlines. I read a recent post by Neil Patel in a similar vein and he has tons of research that proves the same.
Additionally, the approach of making the benefit clear right at the outset is beneficial for the CTR. However further reading and engagement would depend on whether the author actually delivers the promised goods.
I hope to read more of you in the coming months. Keep up the great work!
Thanks so much, Amanda!
Thanks for the article Liz, it will really help me to write down an article, although my english is not good and i am learning it through online portals and hopefully soon i will be able to write some good articles.
Hi Liz,
This is the longest posting i ever read. Full of useful points i need to apply on my blog and certainly need a lot of practice to master it. I usually run out of ideas after 700 words, always stops around that number. Great post.
Glad you enjoyed it, Yunar!
Hi
I have been trying but no traffic so which is the main issue , what do you suggest to get traffic for free and organic not long term
This article is an awesome checklist and will save us the trouble of Checking out the Blog Launch Formula video where Glen gave a kick ass presentation on the same topic. This is also a great resource for training new writers. Bookmarking this.
I will keep in mind next time while i will write a blog.
Hi Liz
Wonderful post, you are going to be the next Neil Patel.
Have you written on ” Site traffic”. I mean I have awful traffic on my blog. How can that be improved.
Anyways, I am going to implement your tips on writing from next time.
Thank you for this beautiful post. Your post will be helpful for us in writing an effective blog post on our site.
Great post Liz! Thank you for sharing these tips on how to write a good blog post.
I have a lot to learn creating blog posts. Hopefully the tips on this page will help me to create something I’m proud to post online. I have many posts I’ve started but never feel they are ready. I best dust them off (update them) and get them posted. 🙂
Thanks Liz
I really appreciate your way of expressing all the points. It will really help me to write an awesome blog post. So thank you so much for providing this gem to us. Keep posting these type of articles. Thanks.
This was a great article. I will definitely apply these methods in my blog posts. Still, have a long way to go. Thanks a lot!
You mentioned each and everything a writer should follow. I have read hundreds of post related to content writing, and this is one of the best instruction posts for writers. I appreciate your hard work. 🙂
Thank you very much for this informative post. Really comprehensive. I am going to use these step which you have mentioned.
Liz Longacre, one of the best articles I have read on blogging. This has covered all the basic tips and tells you not to write mediocre blogs. Catchy headlines and emotional connection are two major factors in a post that you have to practice. I like how you have meticulously discussed about blogging here. Amazing article and thanks a ton.
I love adding inspirational bits in the end. I agree that blogposts should be written to change people’s lives.
Always go back to edit. No one writes perfectly in one go. Don’t be afraid to edit.
Really appreciated how you walked us through the process of writing a great blog post. Loved point #3 about “engaging the senses” I am using this point to make a previously dry review about small business startups more engaging to my readers
Hey Liz,
Really great blog post. I’ve been an SEO for nearly 6 years now and I’m very good at keyword focus, coming up with topics, and writing and executing. That being said, design is one area that I find escapes me the most.
I really enjoy the boxes you use to break up the text in the post, with the “examples” sections. How do you achieve this effect? It reminds me a lot of other nice blogs I see like Brian Dean’s and how he uses on-page elements to keep people on.
I have really enjoyed this piece and others and look forward to using your tips to improve my own site and grow! Thanks
Fantastic article! So much great data!
Thanks so much, Chris!
What a great and very in-depth article to improve our blogs! The examples of decent headlines and sub-headings versus exceptional headlines and subs are very helpful. We can clearly see the huge difference side by side and using your tips can now create better headlines ourselves. Obviously, it will take a little practice and some revisits to these tips, but I am looking forward to writing better blog posts and website pages. Thanks for all the help and advice.
So glad you found it helpful DJ Emir!
Hi,
Thanks for your fresh post. Here I have a question for you. If I am starting with blogger is there any problem with this? I am here that after sometime google will disable account? So which platform is better for me? Thanks
I personally wouldn’t recommend starting with Blogger. Jon actually has a great article on this topic: https://smartblogger.com/how-to-start-a-blog/
Best of luck!
Nice post on how to write blog 2019, You really nailed it. Am impressed. Keep it up!
Thanks so much, Charles!
Hey Liz,
Thanks for the wonderful post. Few questions:
1) How important is the questionable headline (nowadays every other articles headlines with how/what..?)
2) How important is the length of the content, 1500 or more as most of the top bloggers suggest?
3) If anyone decides to write an article of 1500 or more words. Is it good to break it down into sub-headers or paragraphs will do the same as sub-headers?
Would be curious to know your thoughts!
Thanks,
Hi Kuldeep, I might experiment with different types of headlines to see what works best for your audience but as mentioned in this post, ‘how to’ headlines are a great one to start with. In depth articles are good for SEO and perceived value but you can experiment with shorter articles as well if you like. For posts over 1,500 words, yes I would recommend breaking things up with subheads. My best advice is the more you write, the more you learn what works best for your audience so just keep writing 🙂
Hi Liz,
Thanks for your feedback. So its more about diving deep into your own data to see what works & action accordingly.
Hi Liz,
Thank you for sharing this informative article. I learned new things from you. It helped me a lot and I hope that it will also help others. I appreciate your efforts.
Have a good day ahead.
Thanks Vicky, so glad this was helpful to you.
Hi Liz,
Thank you for sharing this informative article. I learned new things from you
You’ve very welcome, Mirza!
Great, great article!
I’m a total beginner, in fact i still have to write my first full post. And I have been very nervous lately because I had no idea how to develop it.
This guide helped me so much to point me in the right direction and cleared my thoughts.
Thanks!!
So glad to hear it, Alberto! Congrats on your first post!
Very useful tips on how to make money from blogging. What a great post, the information is well organized and very comprehensive. I can imagine the effort you put into this and especially appreciate you sharing it.
Thanks so much Adam.
Hi Liz,
I am so grateful to have found your article. I’m an artist, and have finally gotten to a place where I am able to concentrate more on my art and to have an actual web page, (thanks to the help of my daughter) and to begin blogging.( I know that it is essential in today’s world for artists.) I’ve done a lot of research, as well as have a background in writing. You’re article is clear and informative, and I can’t wait to get started.
Thank you!
So glad to hear it, Susan! Best of luck with your blogging & artistic endeavors!
Hi Liz,
I have read it four times. Every time I got something new from the same source. The is an example of evergreen content.
Following your guideline, I have published a post today. I myself understand it become better than Else more posts in my blog.
“Without a headline, they have no roadmap to follow. And so their post goes in multiple directions, leaving readers feeling dizzy, confused and disoriented.”
This quote helps me a lot.
Thanks for your efforts and generosity to us.
So glad this was helpful to you, Hasan!
Got briefly explained within you post “How to Write a Blog Post in 2019: The Ultimate Guide” love it. I’ll try in my blog techrecur. Appreciate your work, Thank you.
You’re most welcome!
I’ve noticed a lot of the examples of blogs used in the advice of Smartblogger articles always assumes the writer intends to write a “How To” blog, especially so in this article, particularly the section about motivation and advice the person can’t ignore.
What if someone actually wants write a blog to entertain and enlighten people, or change minds, or share thoughts, or do something other than cater to the endless deluge of problems people have and their need for self-help? For example, I might like to write articles analyzing the philosophical themes or real world accuracy in fiction, or give my thoughts on controversial social issues, or some other kind of article focused purely on engaging discussion and analysis.
This article’s focus seems too narrow and ill-equipped to give advice on such article topics.
Hi Jonathan, this post is meant to be a guide for beginner writers but by no means is it meant to cage you in. Please feel free to be as creative in your writing as you like!
I agree with your thoughts as you said that catchy title is a necessity of a perfect article. It should be like this if someone read this then he/she should click on the title to read the article. I have work experience on Uc news with 30+ million impressions on my article. In the start, I used to write the simple title with all details in title due to this CTR was so much low but when I start using curiosity in my title then my CTR increase like 5times to 7 times.
That’s great, Aaron! Thanks for reading!
Hi Liz,
Great Post.
It’s by far the best guide for blogs I have read.
I really liked how you said all the things in a not so boring way.
In total Agreement with the thought of the catchy title.
Keep writing such amazing blogs.
Thanks so much for your kind words, Oshin! So glad this was helpful.
Hey,
Thanks for sharing this helpful & wonderful post. i really appreciate your hard work. this is very useful & informative for me.
thanks for sharing with us. thanks a lot.
Regards
FutureTricks
You’re most welcome & thanks for reading!
Liz this is truly fantastic. As someone who with a team of 14 blog writers I loved this. You took a huge topic and made it manageable. What I really loved was this was all about SEO, keywords, meta tags, blah, blah. It was about creating damn good writing. Take good care of your girls.
Hugh, I so appreciate this. Thank you so much for these kind words.
Hey Liz,
Really great blog post. I’ve been an SEO for nearly 6 years now and I’m very good at keyword focus, coming up with topics, and writing and executing. That being said, design is one area that I find escapes me the most.
I really enjoy the boxes you use to break up the text in the post, with the “examples” sections. How do you achieve this effect? It reminds me a lot of other nice blogs I see like Brian Dean’s and how he uses on-page elements to keep people on.
I have really enjoyed this piece and others and look forward to using your tips to improve my own site and grow! Thanks
Hi there, thanks so much! As far as the design here goes, I’m not quite sure, Jon’s team actually took care of that.
Hi Liz,
I agree with Step #5. Gone are the days that we write with a very formal and serious tone. The goal of a blog post is to entertain and that’s what I’m doing with my blog right now. I’d like to entertain as well as educate my readers. Thanks for this comprehensive blog post.
Regards,
Valerie
Thanks for reading, Valerie!
very useful tips on how to make money from blogging. What a great post, the information is well organized and very comprehensive
This is probably the most comprehensive guide to writing a blog post I’ve seen yet and I’ve read a lot of them. I’m a freelance writer in my real life so I thought writing amazing blog posts in my blogging life would be super easy — but not so much. I’m really struggling to create killer headlines that grab attention. That’s a great tip on comparing subheads to your headline to make sure they match, and that they don’t give too little or too much away.
Thanks so much, Rebecca! I can imagine how different it must feel to jump from freelance writing to blogging!
A Very Very Comprehensive article for copywriters like me for building content especially for small business blogs.Thanks for the Share Liz..
Thanks Prasad!
This is a really comprehensive and well-explained article. Great work !!!
Thanks for sharing this inspiring article which can help many to decide on the choices they make for a better blog writing experience.
Thank you Liz for this wonderful writeup. I’m not a very good writer but your article has helped improve my skills. Thanks for your help
Hey Liz
Thanks a lot for your helpful article.
I always try to write about somethin. But i can not write. Because i had not any writing skill and i do not khow how to write a proper article. After reading this helpful article, i think that i have learnt something and which help me to increase my writing skill.
Thanks Liz
I learned so much! It was a lot of information but your format helped so much. It made note-taking so much easier! Thanks for a great article!
Hi, Liz, nice article. These tips will definitely improve anyones blogging skills. Thanks for sharing.
Hello Liz,
What a masterpiece and an insightful guide! I wish I discovered this guide before I started my blog. Noted that I have been doing things wrongly, but I am glad that someone has opened my eyes. Thanks, Liz for this
hey Liz,
I am to this, thats why i was confused how to start blogging. But after ready you guide, i found my lost confidence. Thanks a lot for sharing.
I was actually looking for the format of a blog but this is very helpful and I will keep this in mind.
Liz,
I used to think I was good at writing until I started blogging. Now I realize how bad at this I am. Your guide is a great roadmap. Thanks
I totally agree with you that creating clear, concise and curiosity-invoking headlines makes a blog post more interesting!
Agreed with you Liz. Amazing information you have shared with us. Everyone should read this.
Well, like you said, give credit where its due. I believe this is one of the few articles that read from top to bottom. I was researching tips on how to write articles and blog posts that will engage your audience and I found your blog post. I already sent this article to my content team and advise them on reading through your article from top to bottom, because there is value to this.
Thank you LIZ.
Liz – I just bookmarked this article (and I NEVER bookmark blog articles). My favourite is “quality over quantity”
Hi Liz, thanks for the article I must say I learnt something new today
Attention grabbing headlines and data driven posts are a way to go. You also want to include influencers in your post so as to help later when you start promoting. Thanks for sharing 🙂
Hello Liz
Most of post that i read in past one thing is common that is user intent. It is the base of any article and post the intent is most useful thing. When you write something the basic information as writer is intent.Thanks for great work & good to know some more information
Cheers !
Fantastic!
Your step by step guide will help me to write well optimized the blog posts for my site. Thanks for sharing this with us.
A very good guide. Content is King and every blogger knows that. Writing a Quality blog post is very important in blogging. You have crafted some amazing tips to write a good blog post. Keep Going.
very informative guide on Writing a Blog Post, i will use your tips for my blog, i want to increase my user engagement by writing google quality article, now i know how to do this, thanks for sharing this guide
Dear Liz, I don’t know which words used to tell you that this guide is the richest complete article I have ever found on the web. I read this article for at least 4 hours line by line to make sure I didn’t miss even one line.
I congratulate you deeply. I love all the sincere advice you share in the article, especially when you say you have to be generous and leave advice that is hard to forget. Share everything with the reader, it’s like attracting him to register or buy services. Without lying to you, the character you talk about in the conclusion is me. ahahah.
I am the one who always concludes the articles and I throw a new tips or advice in the conclusions. I learned a lot. Sincerely, thank you and I would not hesitate to recommend this guide to other friends even if they are more French-speaking.
Oscar.
Hey Liz,
Most alluring articles I have read in recent days. The hardest part is to articulate the strategies that would understand people with ease. You are a girl boss in articulating strategies. I am going to work out this strategy in my upcoming articles. Keep posting interesting ones.
I have recently started writing blogs for a company that I work for called Job Vacancy Result. I am also planning to start with my own blog page. This content was surely insightful. Helped me understand the nitty-gritty of Blog writing.
Thank you!
This is something perfect. I was looking for this guide for so long. finally!
I would like to implement it on my blog as well.
Thank you.
Hello Liz,
thank you for the extensive instructions! That saved me some beginner mistakes.
I only recently started my own blog (on finance and saving money) and have been on your side ever since when I want to know something about WordPress and the like.
Best regards,
Fadila
Hey Liz, Thanks a lot for bringing this entire information in one post. This is really helpful. I would definitely get back with the results after implementing them.
Fantastic!
Your step by step guide will help me to write well optimized the blog posts for my site. Thanks for sharing this with us.
Hello Liz,
This a fantastic post.
Your subheading is so accurate and intriguing, which made me read the complete content.
The checklist is definitely handy.
Thanks,
Abhisek
Your blog is a great resource for me as I am building my own. I think I’m going to learn a lot from you.
Hey Liz,
Excellent post. Wanna thank you so much for bringing this such an informative article to us. It really gonna helps many of us.
Thankyou again
Best Regards 🙂
Very good article. Thanks for sharing such an informative blog. 🙂
I always wonder, why my blog post doesn’t outrank my competitors. Then I Google it to find how to write a great blog post, thankfully I reached here. I got the answer and am ready to craft a blog post that fulfills users’ intent along with search engines.
Thank you, Liz.
Hi Liz. This is an amazing post with so many good tips and most importantly examples which make it so much easier to put it into practice. Also the checklist at the end is a great tool. Thanks so much. Best, Babett
Thanks for sharing such a important information for the prospective beginners to start there carrier in blogging.