Looking for a tutorial showing you how to install WordPress, but keep finding resources that tackle every method except the one you need?
We’ve got your back.
In this post, we break down every conceivable way there is to install WordPress.
You’ll learn how to install WordPress using cPanel, Softaculous, MOJO, Fantastico, and QuickInstall; locally on both Windows and Mac; manually using FTP; and we’ll break down popular hosting providers like GoDaddy, Bluehost, and HostGator.
You’ll also learn how to install WordPress Multisite, how to install WordPress in different languages, and more.
Just click the appropriate link in our Table of Contents to jump to the section you need.
Ready?
Let’s go.
Table of Contents
- How to Install WordPress on cPanel (Softaculous, MOJO, Fantastico, and QuickInstall)
- How to Install Wordpress on Localhost (Or, How to Install WordPress Locally)
- How to Install WordPress via FTP (Or, How to Install WordPress Manually)
- How to Install WordPress Multisite
- How to Install WordPress in Your Language
- How to Install WordPress on 12 Popular Web Hosts
- How to Install WordPress on SiteGround
- How to Install WordPress on Bluehost
- How to Install WordPress on GoDaddy
- How to Install WordPress on WP Engine
- How to Install WordPress on Flywheel
- How to Install WordPress on Kinsta
- How to Install WordPress on HostGator
- How to Install WordPress on DreamHost
- How to Install WordPress on A2Hosting
- How to Install WordPress on InMotion Hosting
- How to Install WordPress on iPage
- How to Install WordPress on Hostinger
- Frequently Asked Questions
How to Install WordPress on cPanel (Softaculous, MOJO, Fantastico, and QuickInstall)
So, you decided to start a blog.
Awesome. Now it’s time to roll up your sleeves and get to work installing WordPress.
Thankfully, many of the popular WordPress hosts offer some form of simplified (or even automatic) installation.
If you’re using a “shared” WordPress hosting plan, there’s a good chance your host will use cPanel.
Let’s walk through the cPanel process…
Step #1. Find Out How to Access Your Host’s cPanel
Unfortunately, the way you get to cPanel is not standardized across the web. Different hosts access it differently.
So, before you can do anything, you need to find out how to access your host’s cPanel.
The easiest method is to find the emails your hosting provider sent you when you signed up for your account. Among other valuable bits of information, the URL to your cPanel will be in one of those initial emails.
But if you can’t find the right email, don’t worry.
Just Google the name of your web host and “cPanel login”.
That should do the trick.
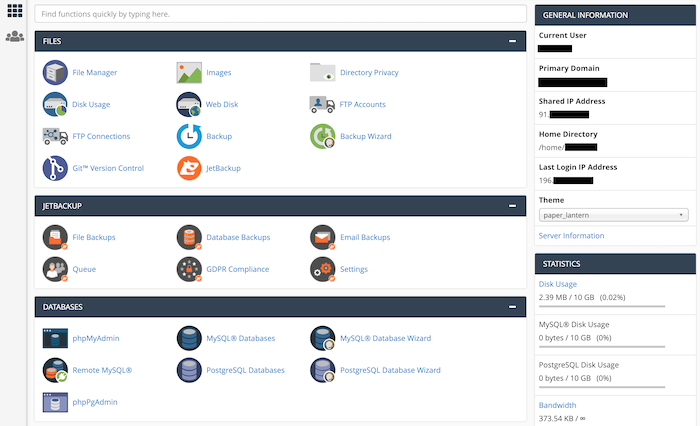
Step #2. Get to Know cPanel
The main cPanel dashboard can be a little intimidating.
Relax.
You don’t have to understand all cPanel has to offer. We’re here to do one thing — learn how to install WordPress.
For that, let’s look for the cPanel installer tools, which are usually located near the bottom of the page.
Your host might be using any of the following installers: Softaculous, Fantastico, QuickInstall, or MOJO Marketplace.
We’re going to focus on Softaculous since it’s the most popular.
But don’t worry if your host uses a different installer.
While the specific interfaces might be a bit different, the idea behind every installer is the same.
Plus, they all ask you for the same set of data and inputs.
Step #3. How to Install WordPress Using Softaculous
To begin, look for the Softaculous section in cPanel.

Click on the WordPress logo. The installer tool will open:
Click on the Install Now button to begin the installation process.
Softaculous needs only a handful of details from you. Here are the fields you should pay special attention to:
- “Choose the version you want to install” — Always go for the most-recent version available.
- “Choose Protocol” — “https://” is the option preferred by Google.
- “Choose Domain” — Leave unchanged if you have just one domain assigned to your server; if you have more than one domain, select the desired one for this installation.
- “In Directory” — Leave empty if you want to install WordPress in the main directory of your domain name (which most people do).
- “Select Plugin(s)” — Optional (but as a general rule: the fewer plugins, the better).
Here’s what the form looks like:
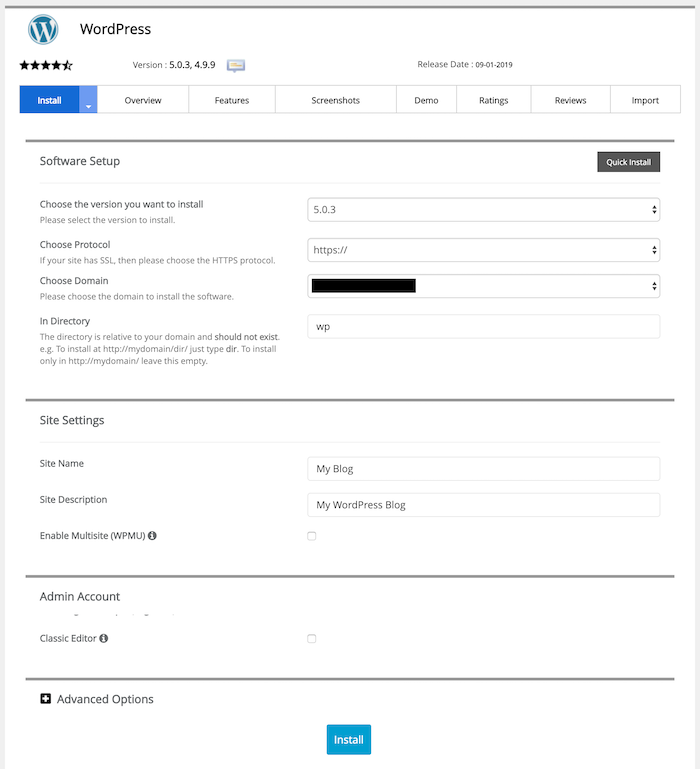
Click Install to proceed.
When the process finishes, Softaculous will show you a final confirmation screen along with links to your WordPress dashboard.
And that’s it!
You’ve installed WordPress using cPanel.
How to Install Wordpress on Localhost (Or, How to Install WordPress Locally)
The instructions for how to install WordPress locally depends on whether you’re using a PC (Windows) or a Mac.
We’ll go over both methods.
First up: Windows.
(If you’re on a Mac, click here to jump ahead.)
How to Install WordPress on Windows
WordPress is a great tool for local web development.
Here’s how you install WordPress locally on Windows:
Step #1. Get XAMPP
XAMPP is a local web server for your computer. It’s an all-in-one package with everything you will need to run software (such as WordPress) locally.
You might have heard of a similar tool called WAMP.
Under the hood, WAMP and XAMPP do the same thing. However, in my opinion, WAMP isn’t as reliable as XAMPP.
For this reason and others, we’ll focus on XAMPP in this tutorial.
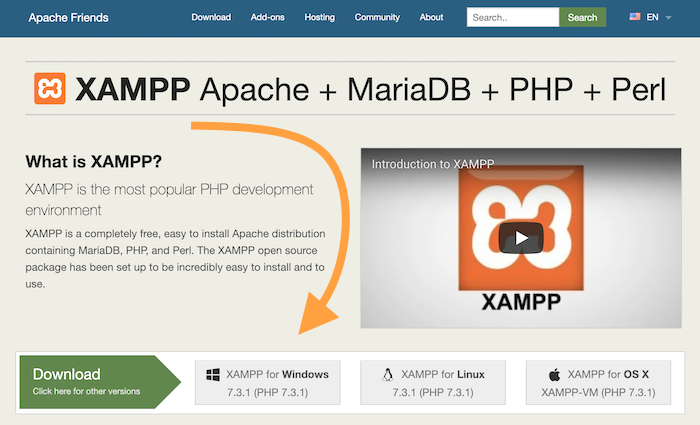
From the XAMPP website, click on the download button for Windows and save the XAMPP package to your desktop.
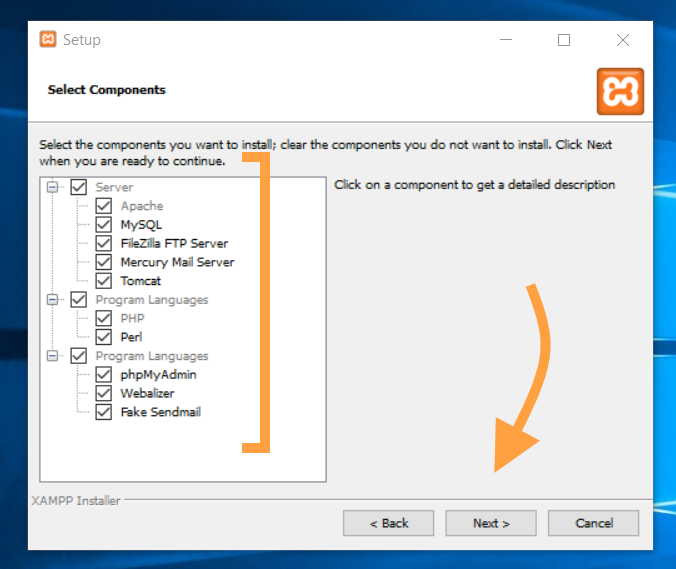
Launch the XAMPP installer and follow the prompts on the screen.
First, select the individual components you want to have installed. To be safe, you can choose all of them:
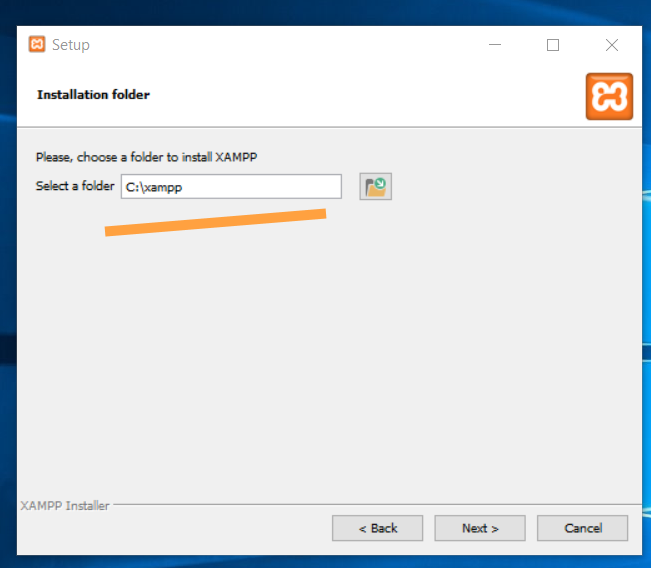
Next, select the installation folder for XAMPP.
XAMPP will take a minute or two to install.
When it’s finished, you’ll see this confirmation screen:
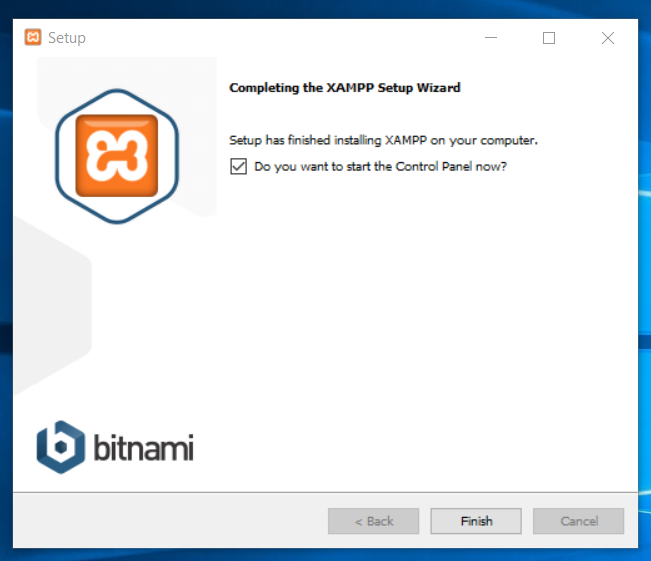
When you click on Finish, you’ll see the main XAMPP config panel.
In it, click on the two Start buttons next to Apache and MySQL.
Like so:

You should see the two labels change to green:
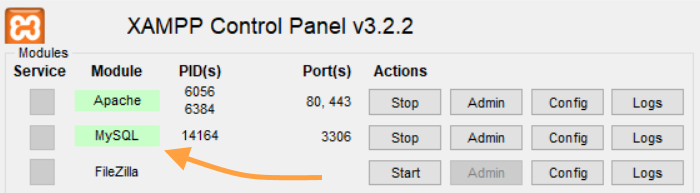
When you see green, your local server is working!
Step #2. Create a Blank Database for WordPress
From the control panel of XAMPP, click on the Admin button in the MySQL row:

This will launch a tool called PHPMyAdmin, which is an open-source database management tool.
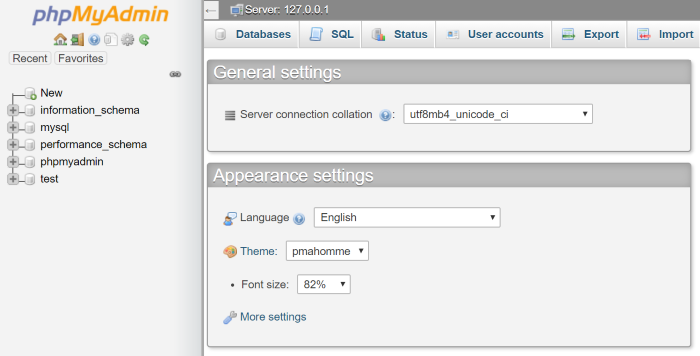
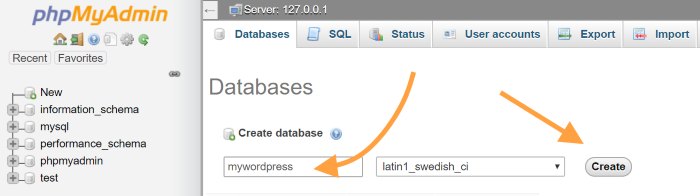
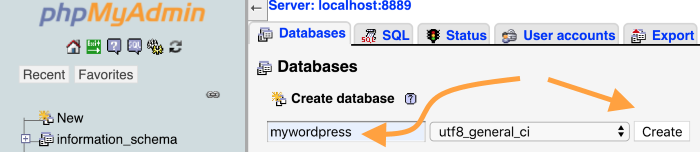
Go into Databases (from the top menu).

Enter a name for your new WordPress database (something simple) and click the Create button:
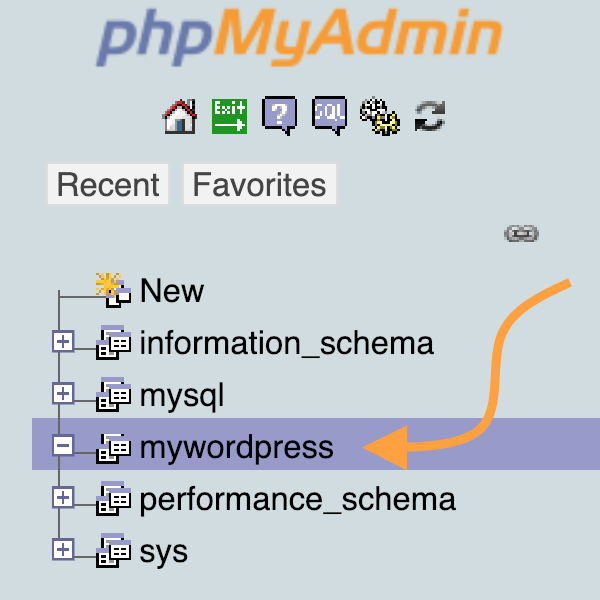
You should see your new blank database in the sidebar:
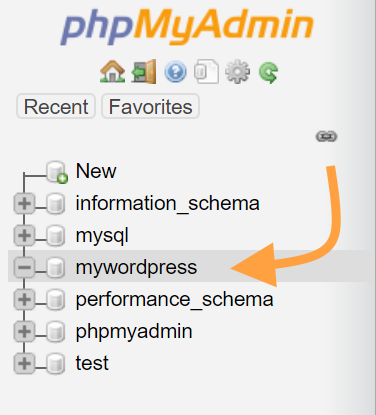
You can now exit PHPMyAdmin.
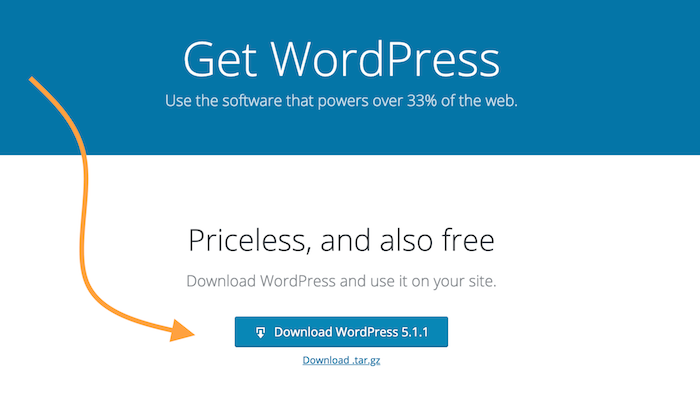
Step #3. Download WordPress
Go to WordPress.org and download the most recent version of the software.
Don’t worry. It’s free:
Next:
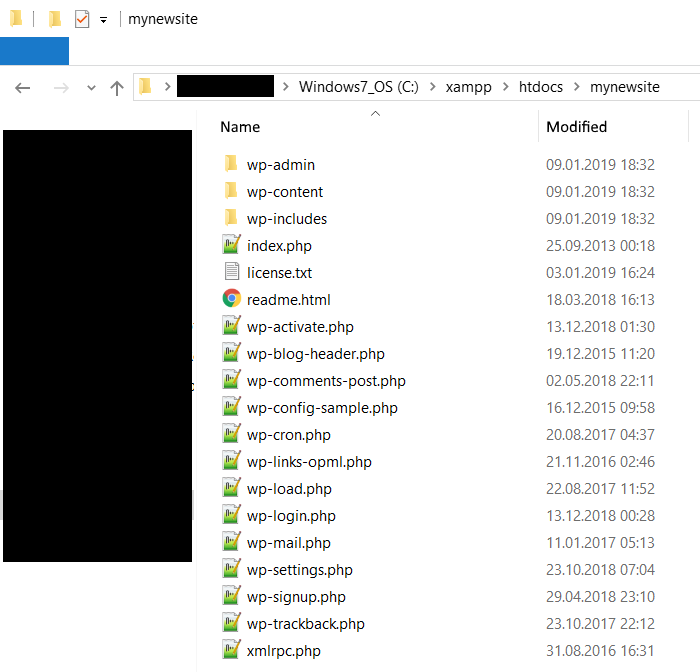
- Save the file to your desktop or downloads folder. Extract it.
- Go to the folder where you installed XAMPP (C:\xampp) and find the htdocs subfolder.
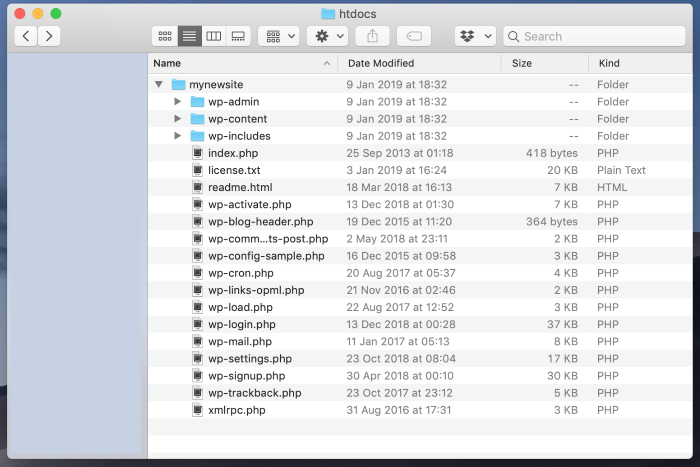
- Create a new subfolder inside htdocs. This is where your site is going to live. For the purpose of this demo, I’ll name the folder mynewsite.
Take the contents of the WordPress archive and move them to this new subfolder (“mynewsite” or whatever you named yours).
It should look like this:
Step #4. Install WordPress Locally on Windows
Open your web browser and navigate to localhost/mynewsite.
What you’ll see is the on-screen WordPress Installation Wizard.
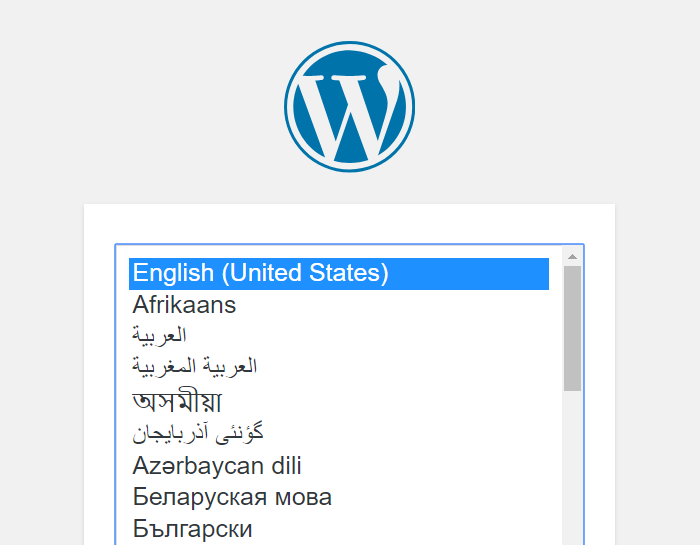
The first step is choosing your language:
The next screen is an info card to get you up to speed with what’s going to happen. Click on Let’s go! once you’ve read it.
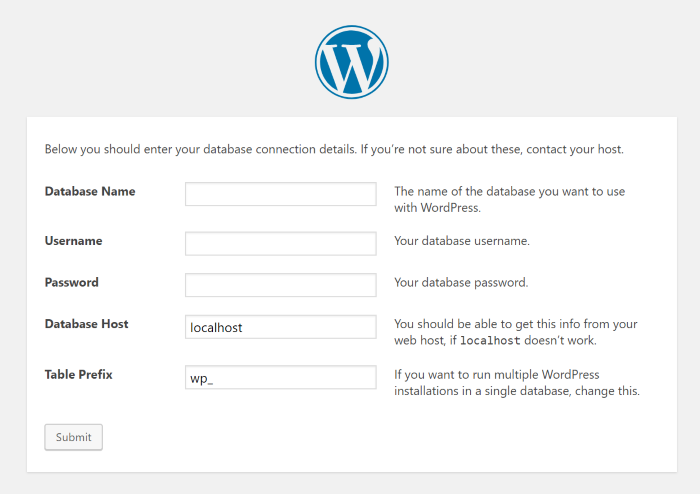
The next step is a crucial one in the installation.
This is where you get to enter the details of your WordPress connection to the database.
Here are my settings based on everything I’ve set in the previous steps so far:
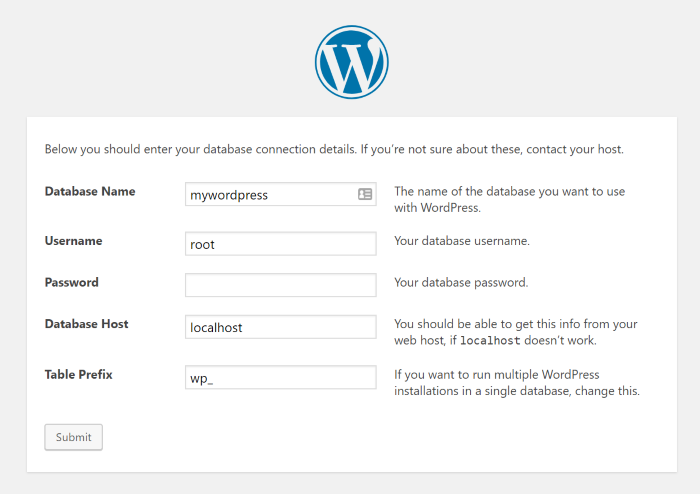
Important parts:
- Database Name — This is the name you set in PHPMyAdmin when creating the database in Step #2.
- Username — Set to root.
- Password — Leave blank.
- Database Host — Set to localhost.
- Table Prefix — Leave as is.
The next step is where you get to set the name of your site and the details of your main admin account:
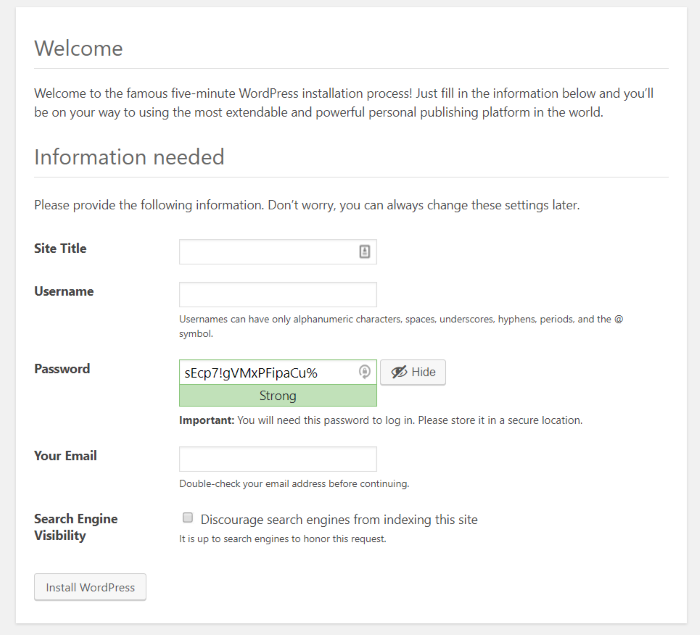
Click on Install WordPress to finalize everything.
And that’s it. You’ve installed WordPress locally on Windows.
How to Install WordPress on Mac
While installing WordPress locally on Mac isn’t the usual “get app from App Store” experience we’re used to, it can still be done with relative ease.
Here’s how to install WordPress on Mac:
Step #1. Get MAMP
MAMP is a local web server that works quite well on Mac.
(It’s also easier to install than some of its alternatives.).
From the MAMP website, go to the downloads section and choose the option for macOS:
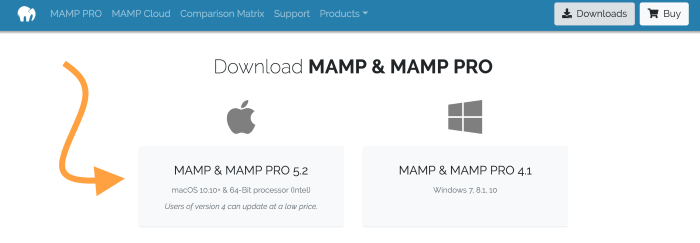
Save the package to your computer.
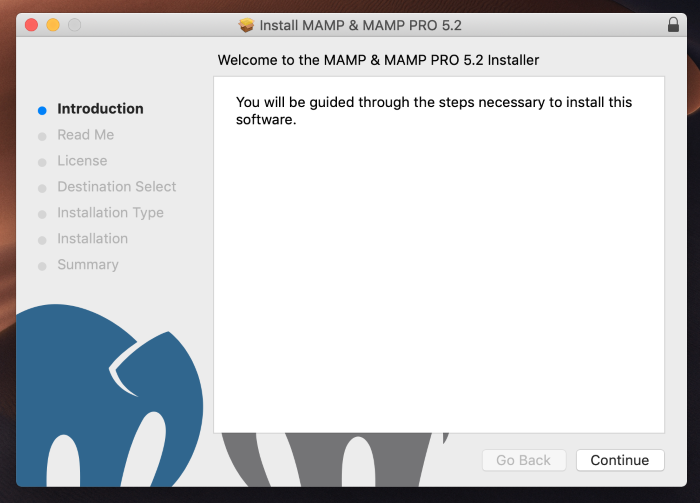
Launch the MAMP installer and proceed through the on-screen wizard.
When the installation finishes, open MAMP from Mac’s Launchpad.
In the config panel, click on the main Start Servers button.
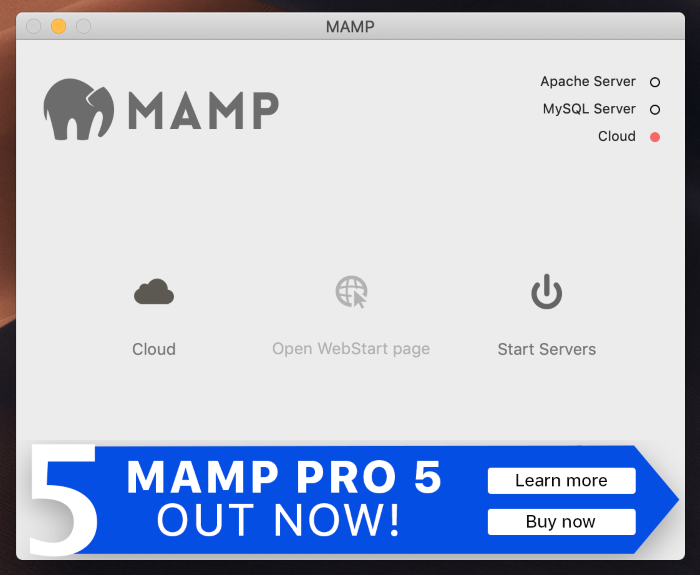
Congrats! Your local server is working.
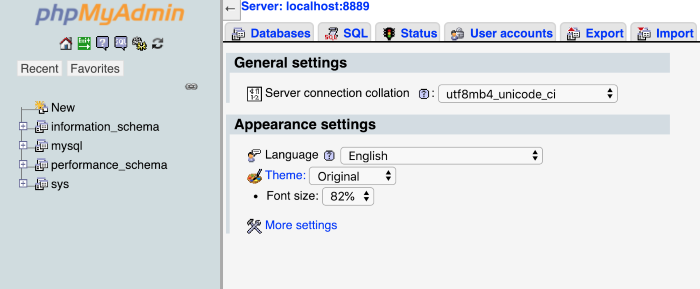
Step #2. Create a Blank Database for WordPress
As soon as you start your server in MAMP, you will be taken to the server’s homepage.
Usually, it’s “http://localhost:8888/MAMP/” (without the quotes).
From there, click on PHPMYADMIN under TOOLS:
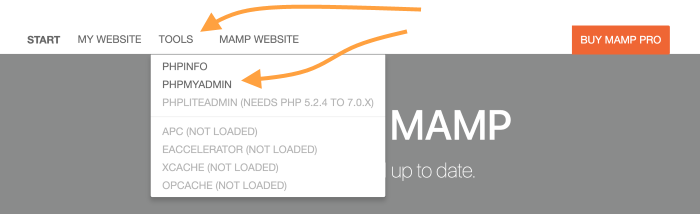
As mentioned earlier in the post, PHPMyAdmin is a handy, open-source database management tool.
We use it to create a new database for WordPress.
Go into Databases (from the top menu):

Enter a name for your new WordPress database (something simple) and click on Create.
Like so:
You should see your new blank database in the sidebar.
You can now exit PHPMyAdmin.
Step #3. Download WordPress
Go to WordPress.org and download the most recent version of the software.
Next:
- Save the archive to your Mac and extract it.
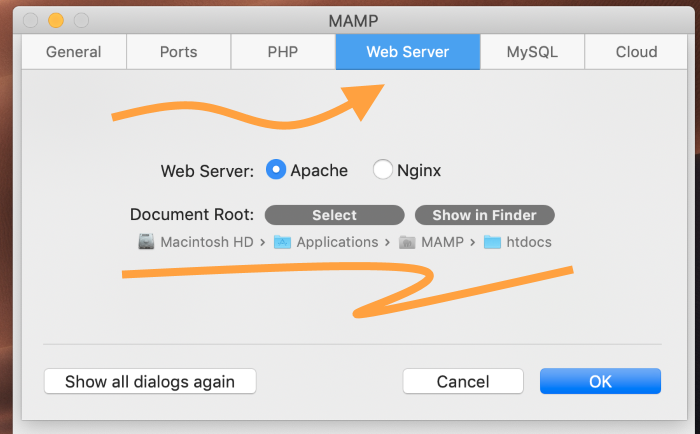
- Go to the default web folder of your server. That’s usually in Applications/MAMP/htdocs. You can check the location of your default web folder by going into MAMP settings and choosing the Web Server tab:

- Create a new subfolder. This is where your site is going to live. For the purpose of this demo, I’ll name my subfolder mynewsite.
Take the contents of the WordPress archive and move them to the new folder you created. It should look like this:
Step #4. Install WordPress Locally on Mac
Open your web browser and go to localhost:8888/mynewsite.
What you’ll see is the on-screen WordPress installation wizard. The first step is choosing your language:
The next screen is an info card to get you up to speed with what’s going to happen. Click Let’s go! once you’ve read it.
In the next step, you will enter the details of your WordPress connection to the database.
Here are my settings based on everything I’ve set in the previous steps:
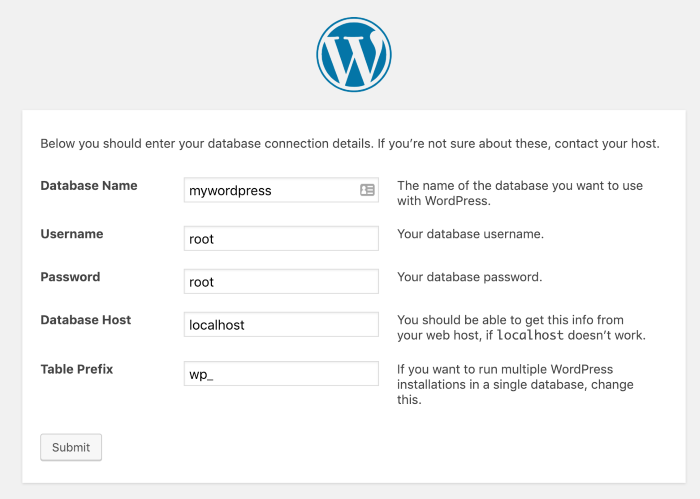
Important parts:
- Database Name — This is the name you set in PHPMyAdmin when creating the database in Step #2
- Username — Set to root.
- Password — Set to root.
- Database Host — Set to localhost.
- Table Prefix — Leave as is.
The next step is where you get to set the name of your site and the details of your main admin account:
Click on Install WordPress to finalize everything.
And that’s it. You’ve installed WordPress locally on a Mac
How to Install WordPress via FTP (Or, How to Install WordPress Manually)
Installing WordPress via FTP takes only minutes, but you do need to have a couple of things ready beforehand.
Chiefly, you need to have access to a web server — aka, a web hosting account.
Start by going to your host of choice and purchasing one of the available web hosting plans. If you already have a web host, you’re ahead of the game!
Next:
Step #1. Download WordPress
Go to WordPress.org and download the latest version of WordPress.
Save the package to your computer and extract its contents.
Step #2. Upload WordPress Files to Your Server
The next step involves connecting to your web server via FTP and uploading your just-downloaded WordPress files.
You’re going to need to use a third-party FTP tool to do that.
FileZilla is a popular one. We’ll use it for the purposes of this demo.
Now, in order to connect to your server, you’ll need your connection details.
This information should have been provided via email when you first signed up for your hosting account. But if you can’t find it, no worries. You can find your FTP information inside your host’s cPanel.
Go to the FTP Accounts section (under FILES):
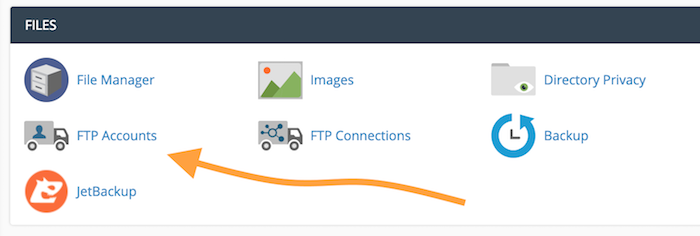
You’ll find your FTP accounts there. Or, alternatively, you can create your FTP account if one doesn’t already exist.
Next to your FTP account, there’s a link labeled Configure FTP Client.
Click on it:

This will reveal a new section.
In it, click on the FTP Configuration File button under FileZilla:
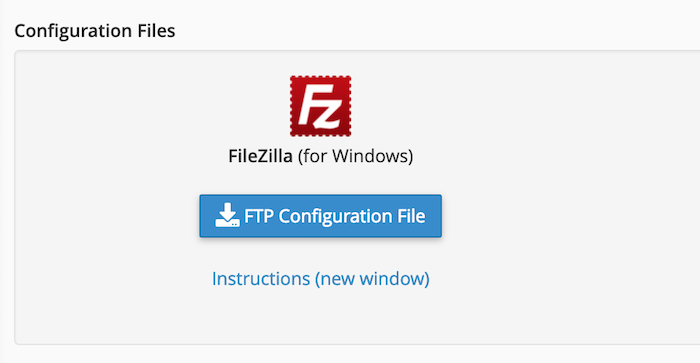
You can open that file with FileZilla and set up your connection details immediately.
With that done, the only thing left to do is upload your WordPress files to the server.
Depending on your hosting setup, you might need to upload WordPress to a specific directory.
However, for most users the directory will be called public_html or public_www.
If in doubt, verify with your web host.
Step #3. Create a New Database for WordPress in cPanel
WordPress, just like any other modern CMS, cannot work without a database.
The database is where all your posts, pages, comments, and other site content are kept.
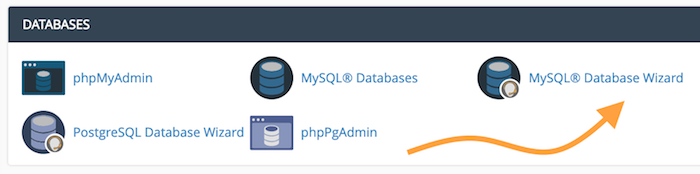
To create a new database, go back to cPanel, scroll down to the DATABASES section, and click on MySQL Database Wizard:
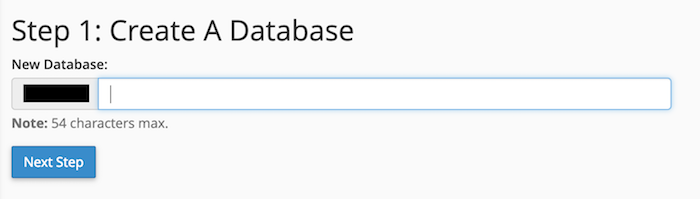
From there, you’ll be guided through the steps to create a new database.
First, pick a name for your database:
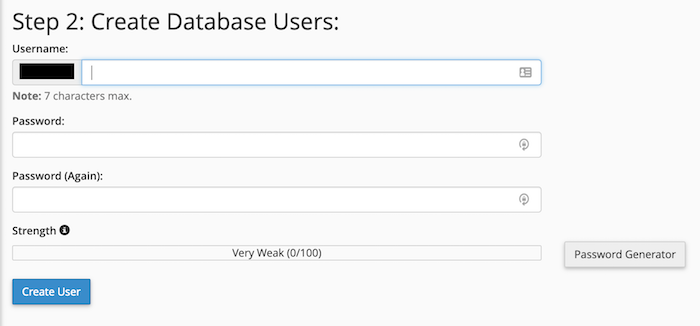
Next, create a new user account that WordPress will use to access the database.
Lastly, assign sufficient access rights to the new user account.
It’s best to do that by simply selecting ALL PRIVILEGES, like so:
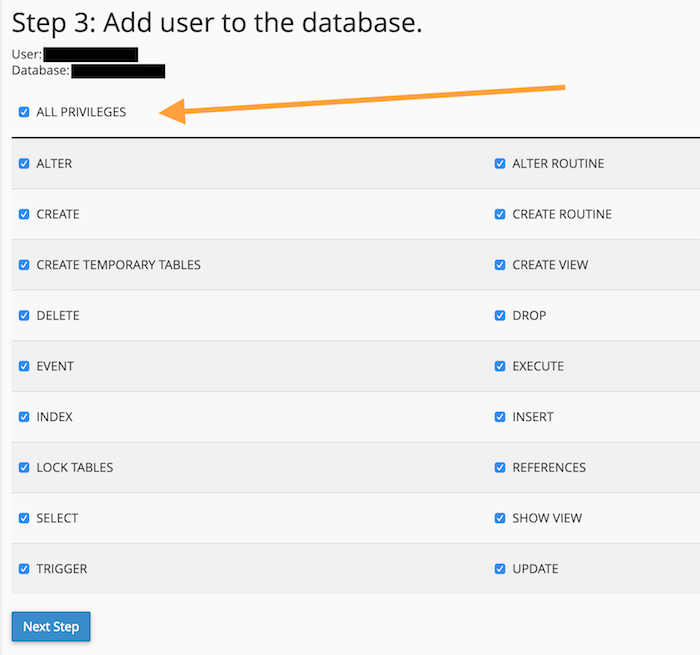
Your database setup is now complete!
Step #4. Install WordPress Through the Online Installer
This is the last step on your journey to getting WordPress installed via FTP.
Simply fire up your browser and navigate to your site’s URL.
You’ll see the main page of the WordPress installer.
First, choose the language of your site:
The next step is a crucial one, and it’s where you’ll need to provide your database details.
(Hopefully you jotted those details down earlier!)
Here’s a breakdown for each:
- Database Name — The name of your database (from the previous step).
- Username — Your chosen username (from the previous step).
- Password — Your chosen password (from the previous step).
- Database Host — In most cases, set this to localhost. If your hosting setup requires a different value here, they can provide this info.
- Table Prefix — You can safely ignore this field and leave as is.
The next step is where you get to set the name of your site and the details of your main admin account:
Click on Install WordPress to finalize everything.
And that’s it! You’ve successfully installed WordPress manually using FTP.
How to Install WordPress Multisite
WordPress Multisite is an interesting feature built into WordPress.
Simply speaking, with WordPress Multisite, you can launch multiple WordPress websites, all working on the same WordPress install.
This is great for businesses and organizations that need multiple websites, but want to keep the cost of managing them low.
WordPress Multisite is also a great choice for universities where it’s very common for individual courses or teachers to have their own sites.
Here’s how to set up and install WordPress Multisite:
Step #1. Install WordPress Locally, via cPanel, or via FTP
To begin your journey with WordPress Multisite, you first need to install WordPress using any of the methods described earlier in this guide.
Go here to install WordPress locally on Windows or here to install WordPress locally on a Mac.
Finally, go here to install WordPress using FTP.
Once you’ve installed WordPress, you’re ready for the next step.
Step #2. Enable WordPress Multisite
Connect to your server via FTP (explained previously in this guide), and download the wp-config.php file from your main WordPress directory.
Open the file in Notepad (or similar software) and add the following line at the bottom:
define (‘WP_ALLOW_MULTISITE’, true);
Save the file and re-upload it to your main WordPress directory via FTP. You’ll want to overwrite the original file.
Step #3. Set up Your WordPress Multisite Network
At this stage, WordPress is ready to let you configure your network of sites. Here’s how:
First, go to your plugins and deactivate all of them.

Next, go to Tools > Network Setup. This is where you create your network of WordPress sites.
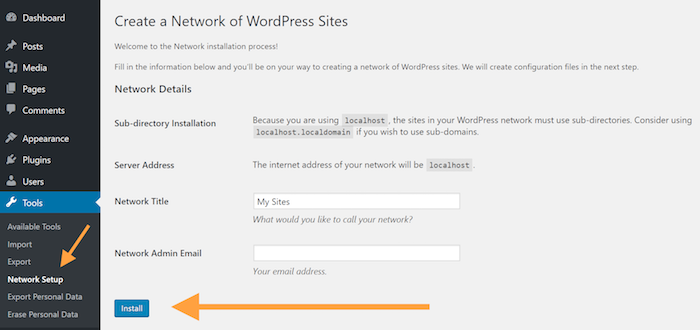
Click on the Install button to begin.
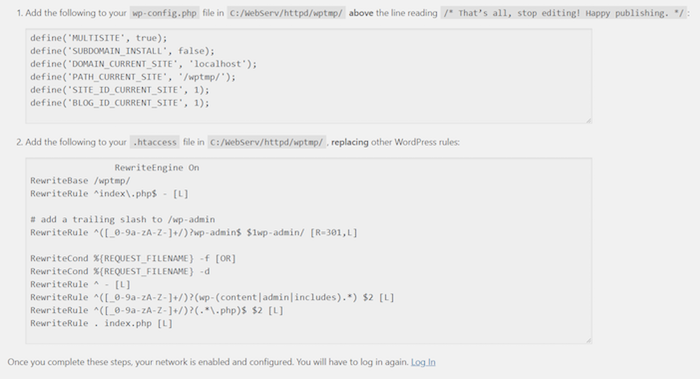
On the next screen, WordPress will give you specific instructions for finalizing the setup.
This will involve editing two files in your WordPress directory (similarly to how we did it a minute ago with wp-config.php).
Example setup:
Step #4. Create your WordPress Multisite Sites
Once you log back into WordPress, you’ll see an updated version of the admin interface with one new section in the top left corner:

This menu is where you can switch between your WordPress sites (and where you can add new sites to the network).
Each website is independent, can feature different content, different user accounts, different themes, different plugins, and so on.
Congrats! You’ve successfully set up WordPress Multisite.
(Feel free to re-activate all your plugins!)
How to Install WordPress in Your Language
Did you know WordPress has been translated into 113 (and counting) languages?
It’s true. You can install WordPress in everything from Afrikaans (South Africa) to 香港中文版 (Simplified Chinese).
In short:
You can install WordPress in your language, no matter what that language might be.
Here’s how to do it:
#1. Download WordPress in Your Language
Go to WordPress.org.
Since WordPress is quite predictive and helpful with international users, based on your location, you’ll see a note encouraging you to download WordPress in your language.
Here’s an example:
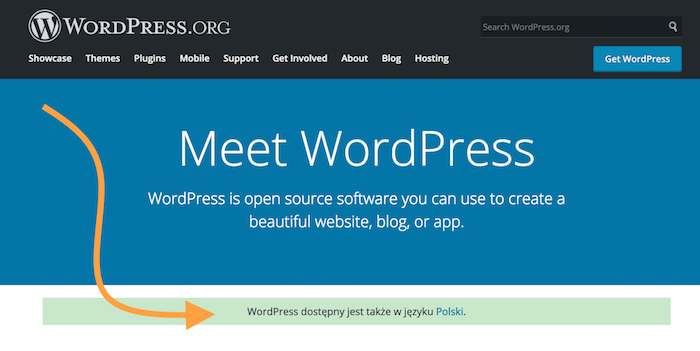
What the above box says is:
“WordPress is also available in Polish.”
When you click on the language — in this example, “Polski” — you’ll get redirected to a new, localized WordPress website.
Once there, download the WordPress package and save the ZIP file to your desktop and extract its contents.
#2. Install WordPress via FTP
Next, follow the same instructions we discussed earlier in this guide.
Click here to jump to Upload WordPress Files to Your Server.
Bonus Tip: Installing Language Files from the Admin Dashboard
If you’ve already installed WordPress in one language, but you’d like to use a different language, don’t fret.
WordPress makes switching your language a breeze.
In your Dashboard, go to Settings > General > Site Language.
Then simply choose the language you’d like to use.
And that’s it! You’re done.
How to Install WordPress on 12 Popular Web Hosts
The following section covers how to install WordPress on 12 popular hosting providers. Click on a link below to jump to your host:
- How to Install WordPress on SiteGround
- How to Install WordPress on Bluehost
- How to Install WordPress on GoDaddy
- How to Install WordPress on WP Engine
- How to Install WordPress on Flywheel
- How to Install WordPress on Kinsta
- How to Install WordPress on HostGator
- How to Install WordPress on DreamHost
- How to Install WordPress on A2Hosting
- How to Install WordPress on InMotion Hosting
- How to Install WordPress on iPage
- How to Install WordPress on Hostinger
How to Install WordPress on SiteGround
SiteGround (affiliate link) offers a cool wizard tool to get your WordPress installed in minutes. There’s no need to deal with any coding, settings, or uploading things a server.
Here’s a video showing you the process:

But, if you prefer written instructions, here are the steps:
When you log into your SiteGround user panel for the first time, you’ll be greeted by a message asking if you’d like to have a new website set up for you:
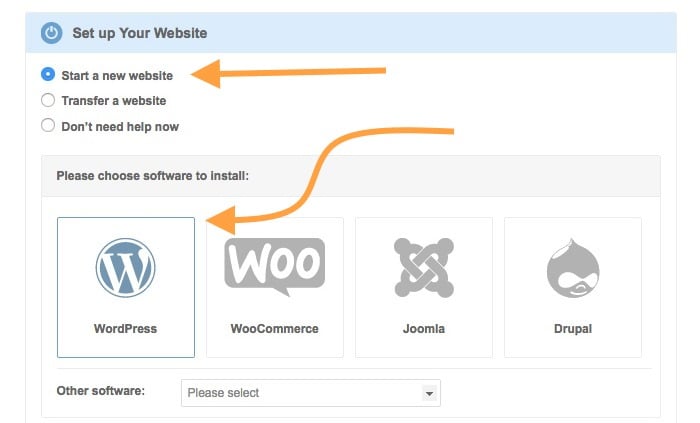
Click on the option labeled “Start a new website” and select WordPress as your platform.
SiteGround will also create a new admin account for you. All you need to do is provide the login details:
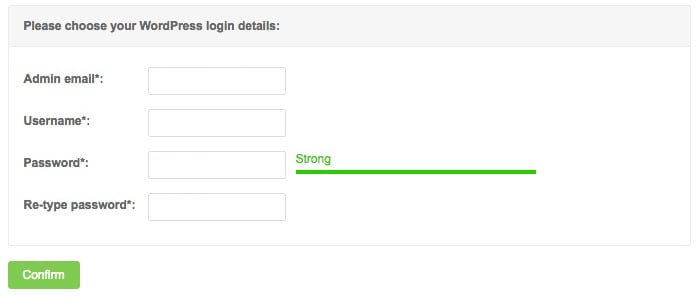
That’s all there is to it.
How to Install WordPress on Bluehost
When you sign up for a Bluehost WordPress Hosting plan, the latest version of WordPress is installed automatically for you. All you have to do is configure it.
Here are the steps:
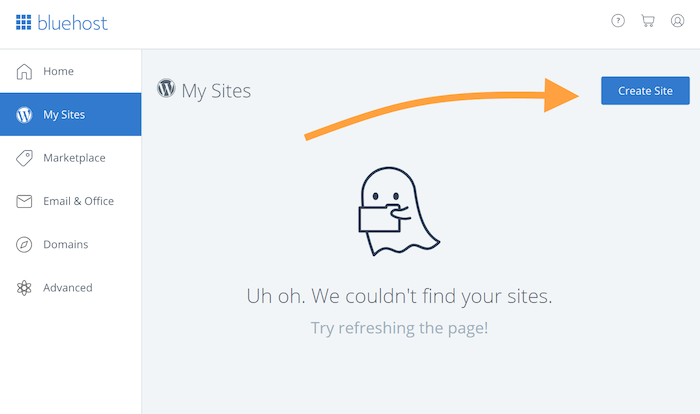
If you’d like to set up additional WordPress sites, it’s easy to do so via the Bluehost dashboard.
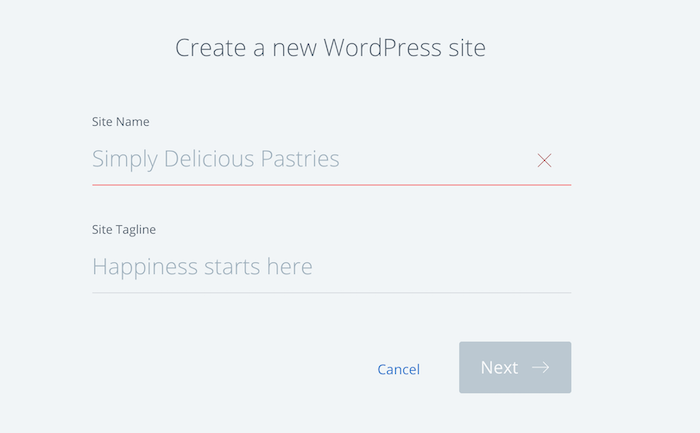
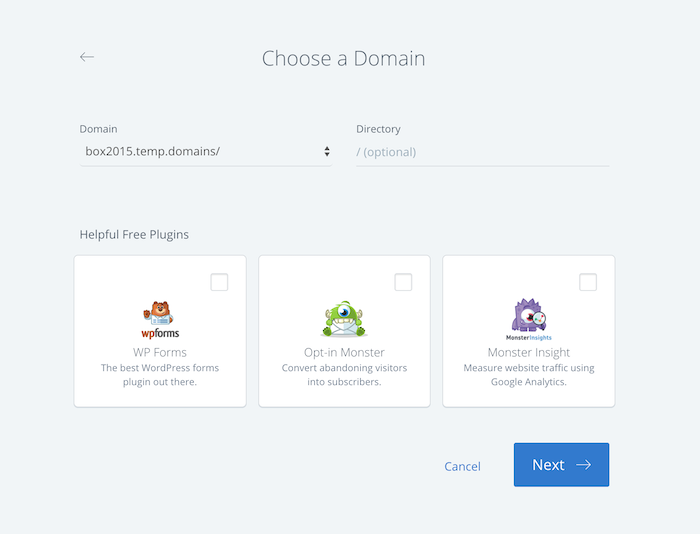
Go to My Sites, and then click on Create a Site.
Enter your site details and proceed through the individual screens.
First, you’ll need to pick a name for your WordPress installation:
You will then enter the domain name and directory, plus any optional plugins you might want:
Finally, set your admin user login and password.
How to Install WordPress on GoDaddy
GoDaddy uses cPanel for installing WordPress on their hosting plans.
Here’s a video walking you through the entire (simple) process:

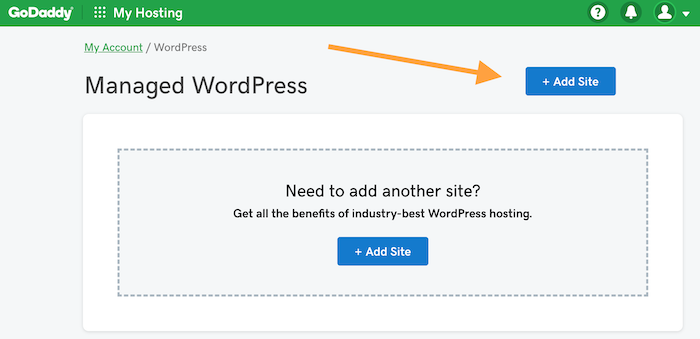
And if you need to add another WordPress site, that’s easy too.
Log into your GoDaddy user panel, go to Managed WordPress > Manage All. Click Add Site.
From this point on, GoDaddy will take you by the hand and do most of the work for you. All you’ll need to do is enter a name for your site and your desired login credentials for the admin user.
When the installation finishes, GoDaddy will show you a WordPress Setup Wizard to help you customize your site:
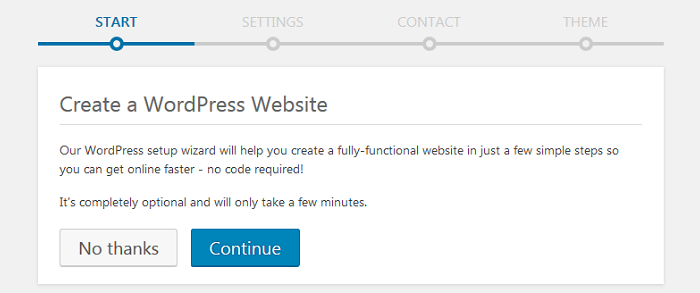
You can click No thanks or Continue.
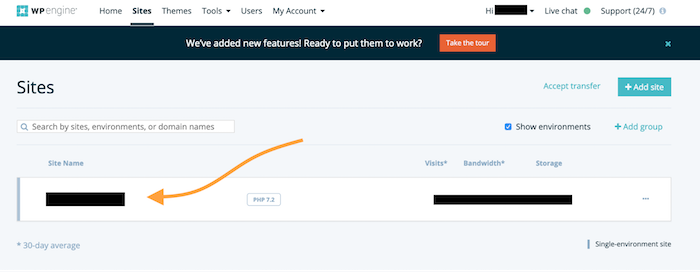
How to Install WordPress on WP Engine
WP Engine (affiliate link) is one of the original “managed” WordPress hosting platforms. They handle all the technical heavy lifting for you, so you can focus on what’s important for your website’s success.
What this means in practice is WP Engine will install WordPress for you when you create an account. You don’t have to lift a finger.
You access the site from your user panel:
If you want to add additional sites to your WP Engine setup, it’s pretty easy. Here’s a video tutorial showing you how:
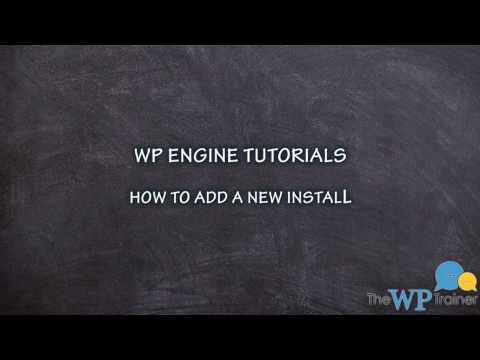
If you prefer written instructions, here’s WP Engine’s official guide for adding or deleting WordPress installs.
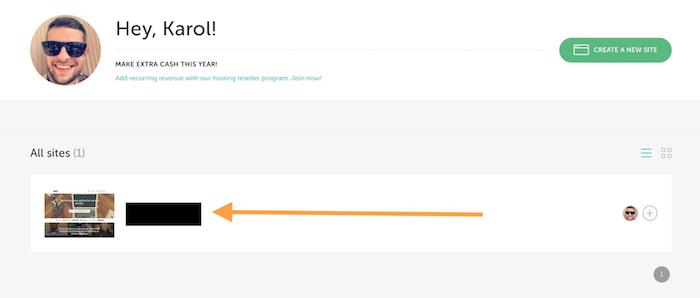
How to Install WordPress on Flywheel
Like WP Engine, Flywheel is a managed WordPress hosting platform. They take care of the technical aspects — including installing WordPress — for you. All you have to do is provide a few pieces of info.
Here’s a video walking you through the process:

If you would like to create additional sites, from your user profile click the Create a New Site button:
Next, provide all the necessary details such as site name, admin user login, password, and your preferred payment method.
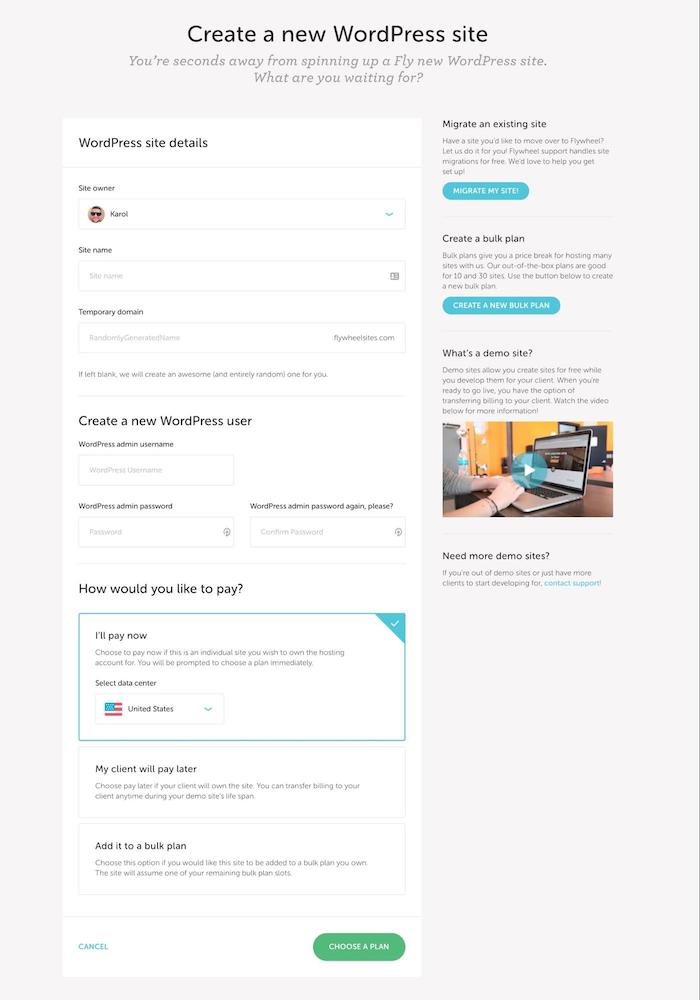
Once you’ve completed the form, your site will become visible in your user profile.
That’s all there is to it.
Here’s Flywheel’s official guide for adding new sites if you need more information.
How to Install WordPress on Kinsta
Kinsta is a newcomer to the managed WordPress hosting market. Like WP Engine and Flywheel, Kinsta installs WordPress for you when you create your account.
If you’d like to add additional WordPress sites to your Kinsta plan, follow the steps in this video:

If you prefer written instructions, here’s Kinsta’s official guide for adding WordPress sites.
How to Install WordPress on HostGator
Like many shared WordPress hosts, HostGator gives you access to cPanel. With it, you can easily install WordPress using the steps in the video below:

Can’t play the video? No worries.
HostGator also offers an extensive how-to article for installing WordPress on their platform.
How to Install WordPress on DreamHost
For each of their WordPress hosting plans, DreamHost provides WordPress pre-installed. All the work is done for you.
If you’d like to add additional WordPress sites, here’s a video showing you how it’s done:

Prefer written instructions?
Here is Dreamhost’s how-to article for using their handy 1-Click WordPress Install.
How to Install WordPress on A2Hosting
A2Hosting offers both shared and managed WordPress hosting.
For shared hosting, they offer 1-Click WordPress installation using Softaculous. Here’s a video to walk you through the steps:
If you opt for one of their managed hosting plans, WordPress will come pre-installed with your A2Hosting account.
If you’d like to add more WordPress installs to your account, here’s the official A2Hosting video to show you how:

How to Install WordPress on InMotion Hosting
Like its managed-hosting competitors, InMotion Hosting provides pre-installed WordPress on your hosting account from the get-go. This means that you don’t need to install WordPress on your own.
If you’d like to install WordPress on an add-on domain, InMotion offers this handy tutorial video:

How to Install WordPress on iPage
Just like other “managed” WordPress hosting companies, iPage provides WordPress pre-installed with your account. (You also get a set of pre-installed WordPress themes and plugins.)
Here’s a helpful video showing you how to configure your iPage Wordpress site:

If you need to install some additional WordPress sites on iPage, click here to read their guide.
How to Install WordPress on Hostinger
Hostinger offers a quick-and-easy auto installer for WordPress.
Here’s their official video showing you how it’s done:
If you prefer written directions, here’s Hostinger’s tutorial for installing WordPress (using various methods).
Frequently Asked Questions
Before we wrap things up, let’s go over a few common, related questions we often hear:
Do I Need to Install WordPress?
Answer: It depends.
If you use a “managed” web host like WP Engine, installing WordPress is taken care of for you. You don’t have to do anything (beyond filling in a few pieces of information).
However, if you’re using a “shared” hosting plan, you’ll need to install WordPress.
The good news is that most web hosts have made the process easy. A few clicks and you’re finished.
Does WordPress Cost Money?
No, the WordPress software is 100% free. Anyone can go to WordPress.org and download it for free at any time.
The typical costs for running a WordPress website come from other factors, such as purchasing a domain name and choosing a hosting provider.
Does WordPress Include Hosting? (Or, Does WordPress Host Your Site?)
If you’re using WordPress.com, the answer is yes.
WordPress.com is a free, hosted version of the WordPress software offered by the company. (You can upgrade to various paid plans if you need more features.)
However, if you’re using the self-hosted version of the software available for free at WordPress.org, the answer is no. You’ll need a hosting provider.
Which Hosting is Best for WordPress?
WordPress.org officially recommends Bluehost, DreamHost, and SiteGround.
At Smart Blogger, we recommend SiteGround (affiliate link) and WP Engine (affiliate link).
Since SiteGround is on both lists, it’s safe to say it’s a solid option.
How to Install WordPress Themes?
Your WordPress installation will come with several free WordPress themes (designs), but there are thousands of additional themes — both free and premium — you can add.
Here’s a quick guide for how to install WordPress themes from inside your WordPress dashboard.
How to Install WordPress Plugins?
Though you have to be careful not to go overboard with them, WordPress plugins are one of the software’s best features — they allow you to add all sorts of functionality to your WordPress site that’s not available out of the box.
SiteGround has published a helpful tutorial for how to install WordPress plugins if you would like step-by-step instructions.
How to Install Facebook Pixel on WordPress?
If you’re interested in running Facebook Ads (either now or in the future), you need to install a Facebook Pixel on your WordPress site.
What’s a Facebook Pixel? It’s a piece of tracking code you add to your website that collects data whenever someone visits your site or takes a specific action.
Here’s a video explaining it in more detail (including how to install it):

If you prefer written instructions, here is Facebook’s help article on Facebook Pixel, which includes steps for creating and installing them.
It’s Time to Install WordPress
Installing WordPress can be overwhelming — especially if you’ve never done it before.
Hopefully, this in-depth guide has been able to point you in the right direction. Use it, bookmark it, and feel free to share it with a friend.
And if there’s an installation method we missed, tweet us or let us know about it in the comments. We’ll happily add it.